Image transformations
On this page
Image mixin
- class simba.mixins.image_mixin.ImageMixin[source]
Methods to slice and compute attributes of images from tracking data and comparing those image attributes across sequential images.
This can be helpful when the behaviors studied are very subtle and the signal is very low in relation to the noise within the pose-estimated data. In these use-cases, we cannot use pose-estimated data directly, and we instead study histograms, contours and other image metrics within images derived from the intersection of geometries (like a circle around the nose) across sequential images. Often these methods are called using image masks created from pose-estimated points within
simba.mixins.geometry_mixin.GeometryMixinmethods.Important
If there is non-pose related noise in the environment (e.g., there are non-experiment related light sources that goes on and off, or other image noise that doesn’t necesserily affect pose-estimation reliability), this will negatively affect the reliability of most image attribute comparisons.
- static add_img_border_and_flood_fill(img, invert=False, size=1)[source]
Add a border to the input image and perform flood fill.
E.g., Used to remove any black pixel areas connected to the border of the image. Used to remove noise if noise is defined as being connected to the edges of the image.

- static brightness_intensity(imgs, ignore_black=True, verbose=False)[source]
Compute the average brightness intensity within each image within a list.
For example, (i) create a list of images containing a light cue ROI, (ii) compute brightness in each image, (iii) perform kmeans on brightness, and get the frames when the light cue is on vs off.
See also
For GPU acceleration, see
simba.data_processors.cuda.image.img_stack_brightness(). For geometry based brightness, seesimba.mixins.geometry_mixin.GeometryMixin.get_geometry_brightness_intensity()- Parameters
imgs (Union[List[np.ndarray], np.ndarray]) – List of images as arrays or 3/4d array of images to calculate average brightness intensity within.
ignore_black (Optional[bool]) – If True, ignores black pixels. If the images are sliced non-rectangular geometric shapes created by
slice_shapes_in_img, then pixels that don’t belong to the shape has been masked in black.
- Returns
List of floats of size len(imgs) with brightness intensities.
- Return type
List[float]
- Example
>>> img = cv2.imread('/Users/simon/Desktop/envs/troubleshooting/khan/project_folder/videos/stitched_frames/0.png').astype(np.uint8)
>>> ImageMixin.brightness_intensity(imgs=[img], ignore_black=False)
>>> [159.0]
- static canny_edge_detection(img, threshold_1=30, threshold_2=200, aperture_size=3, l2_gradient=False)[source]
Applies Canny edge detection to the input image using specified thresholds, aperture size, and L2 gradient option.
Canny edge detection is an edge detection algorithm that uses gradient values to identify sharp changes in intensity in an image, which correspond to edges.
Note
High sensitivity: threshold_1 = 10 threshold_2 = 60 Ultra-high sensitivity: threshold_1 = 5 threshold_2 = 40
- Parameters
img (np.ndarray) – A 2D or 3D NumPy array representing the input image. If the image has 3 channels (RGB or BGR), it will be converted to grayscale.
threshold_1 (Optional[int]) – The lower threshold value for the Canny edge detection. Default is 30.
threshold_2 (Optional[int]) – The upper threshold value for the Canny edge detection. Default is 200.
aperture_size (Optional[int]) – The aperture size for the Sobel operator used during edge detection. It must be an odd number between 3 and 7. Default is 3. Larger values reduce sensitivity to fine details.
l2_gradient (Optional[bool]) – If set to True, the L2 norm is used to calculate the gradient magnitude. If False, the L1 norm is used. Default is False.
- Returns
A NumPy array representing the detected edges in the image.
- Return type
np.ndarray
- static close(x, kernel, iterations=3)[source]
Performs morphological closing on the provided image(s). Closing is a dilation operation followed by erosion, commonly used to fill small holes or gaps in an image.
- Parameters
x (Union[List[np.ndarray], np.ndarray]) – Input image or list of images to process. Each image must be greyscale or black-and-white.
kernel (Tuple[int, int]) – Tuple specifying the size of the structuring element used for the closing operation.
iterations (int) – Number of times the closing operation is applied. Defaults to 3.
- Returns
Processed image or list of processed images after morphological closing.
- Return type
Union[List[np.ndarray], np.ndarray]
- static create_time_ruler(width, video_path, height=60, num_divisions=6, font='Arial', bg_color=(255, 255, 255), line_color=(128, 128, 128), text_color=(0, 0, 0), padding=60, show_time=True)[source]
Create a horizontal ruler/scale bar with tick marks and labels.

- Parameters
width (int) – Width of the ruler in pixels (should match timelapse image width if one is used)
video_path (Union[str, os.PathLike]) – Path to video file to get metadata from
height (int) – Height of the ruler in pixels. Default 60.
num_divisions (int) – Number of major divisions on the ruler. Default 6.
font (str) – Font name to use for labels. Default ‘Algerian’.
bg_color (Tuple[int, int, int]) – Background color (R, G, B). Default white.
line_color (Tuple[int, int, int]) – Color for tick marks and lines (R, G, B). Default grey.
text_color (Tuple[int, int, int]) – Color for text labels (R, G, B). Default black.
show_time (bool) – If True, show time labels, else show frame numbers. Default True.
- Returns
Ruler image as numpy array (BGR format for OpenCV compatibility)
- Return type
np.ndarray
- Example
>>> ruler = ImageMixin.create_time_ruler(width=1920, video_path='path/to/video.mp4', height=60, num_divisions=6)
- static create_uniform_img(size, color=(0, 0, 0), save_path=None)[source]
Creates an image of specified size and color, and optionally saves it to a file.

- Parameters
size (Tuple[int, int]) – A tuple of two integers representing the width and height of the image.
color (Tuple[int, int, int]) – A tuple of three integers representing the RGB color (e.g., (255, 0, 0) for red). Defaults to black (0, 0, 0).
save_path (Optional[Union[str, os.PathLike]]) – a string representing the file path to save the image. If not provided, the function returns the image as a numpy array.
- Returns
If save_path is provided, the function saves the image to the specified path and returns None. f save_path is not provided, the function returns the image as a numpy ndarray.
- Return type
Union[None, np.ndarray]
- Example
>>> from simba.utils.data import create_color_palette
>>> clrs = create_color_palette(pallete_name='inferno', increments=4, as_int=True)
>>> imgs_stack = np.full((5, 10, 10, 3), -1)
>>> for cnt, i in enumerate(clrs): imgs_stack[cnt] = ImageMixin.create_uniform_img(size=(10, 10), color=tuple(i))
- static cross_correlation_matrix(imgs)[source]
Computes the cross-correlation matrix for a given array of images.
This function calculates the cross-correlation coefficient between each pair of images in the input array. The cross-correlation coefficient is a measure of similarity between two images, with values ranging from -1 (completely dissimilar) to 1 (identical).
The function uses the numba library for Just-In-Time (JIT) compilation to optimize performance, and prange for parallel execution over the image pairs.
See also
For simple two image NCC comparison, see
simba.mixins.image_mixin.ImageMixin.cross_correlation_similarity()For time-series based NCC comparisons, seesimba.mixins.image_mixin.ImageMixin.sliding_cross_correlation_similarity()Note
Use greyscale images for faster runtime. Ideally should be moved to GPU.
- Parameters
imgs (np.array) – A 3D (or 4D) numpy array of images where the first dimension indexes the images, and the remaining dimensions are the image dimensions (height, width, [channels]). - For grayscale images: shape should be (n_images, height, width) - For color images: shape should be (n_images, height, width, channels)
- Returns
A 2D numpy array representing the cross-correlation matrix, where the element at [i, j] contains the cross-correlation coefficient between the i-th and j-th images.
- Return type
np.array
- Example
>>> imgs = ImageMixin.read_all_img_in_dir(dir='/Users/simon/Desktop/envs/simba/troubleshooting/RAT_NOR/project_folder/videos/examples/test')
>>> imgs = ImageMixin.read_all_img_in_dir(dir='/Users/simon/Desktop/envs/simba/troubleshooting/RAT_NOR/project_folder/videos/08102021_DOT_Rat11_12_frames')
>>> imgs = {k: imgs[k] for k in sorted(imgs, key=lambda x: int(x.split('.')[0]))}
>>> imgs = np.stack(list(imgs.values()))
>>> imgs = ImageMixin.img_stack_to_greyscale(imgs=imgs)
>>> results = ImageMixin.cross_correlation_matrix(imgs=imgs)
- static cross_correlation_similarity(img_1, img_2)[source]
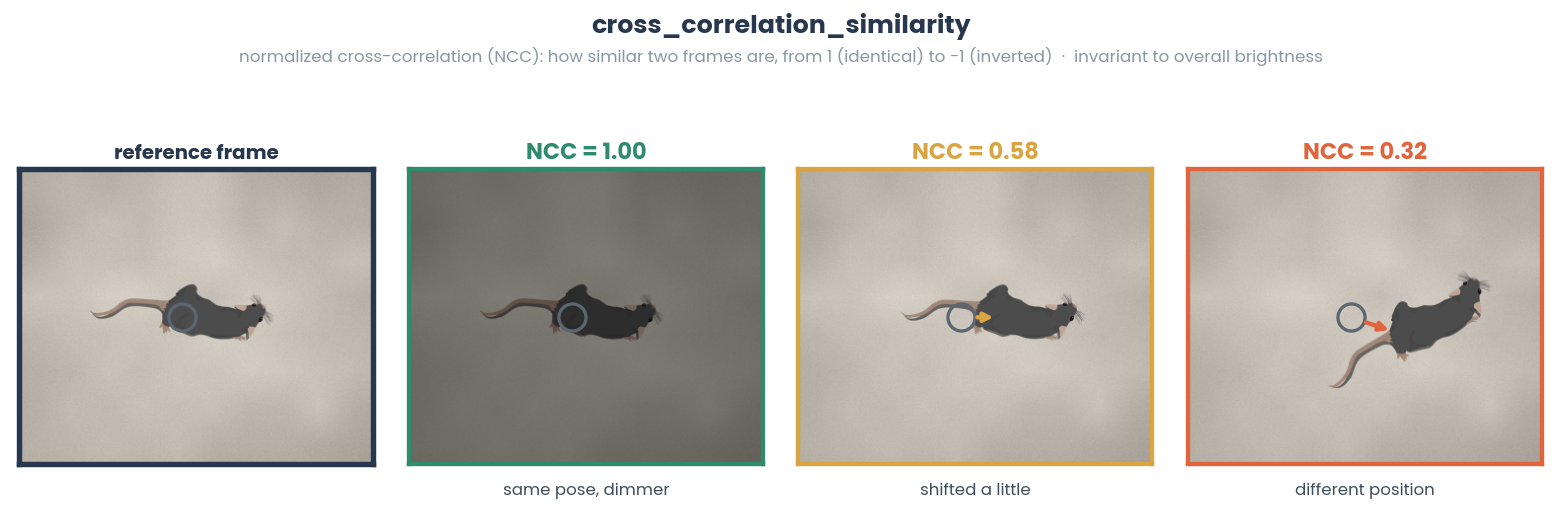
Computes the Normalized Cross-Correlation (NCC) similarity between two images.
The NCC measures the similarity between two images by calculating the correlation coefficient of their pixel values. The output value ranges from -1 to 1, where 1 indicates perfect positive correlation, 0 indicates no correlation, and -1 indicates perfect negative correlation.
See also
For time-series based NCC comparisons, see
simba.mixins.image_mixin.ImageMixin.sliding_cross_correlation_similarity()For matrix based NCC comparisons, seesimba.mixins.image_mixin.ImageMixin.cross_correlation_matrix()- Parameters
img_1 (np.ndarray) – The first input image. It can be a 2D grayscale image or a 3D color image.
img_2 (np.ndarray) – The second input image. It must have the same dimensions as img_1.
- Returns
The NCC value representing the similarity between the two images. Returns 0.0 if the denominator is zero, indicating no similarity.
- Return type
- Example
>>> img_1 = cv2.imread('/Users/simon/Desktop/envs/simba/troubleshooting/RAT_NOR/project_folder/videos/examples/a.png').astype(np.uint8)
>>> img_2 = cv2.imread('/Users/simon/Desktop/envs/simba/troubleshooting/RAT_NOR/project_folder/videos/examples/f.png').astype(np.uint8)
>>> ImageMixin.cross_correlation_similarity(img_1=img_1, img_2=img_2)
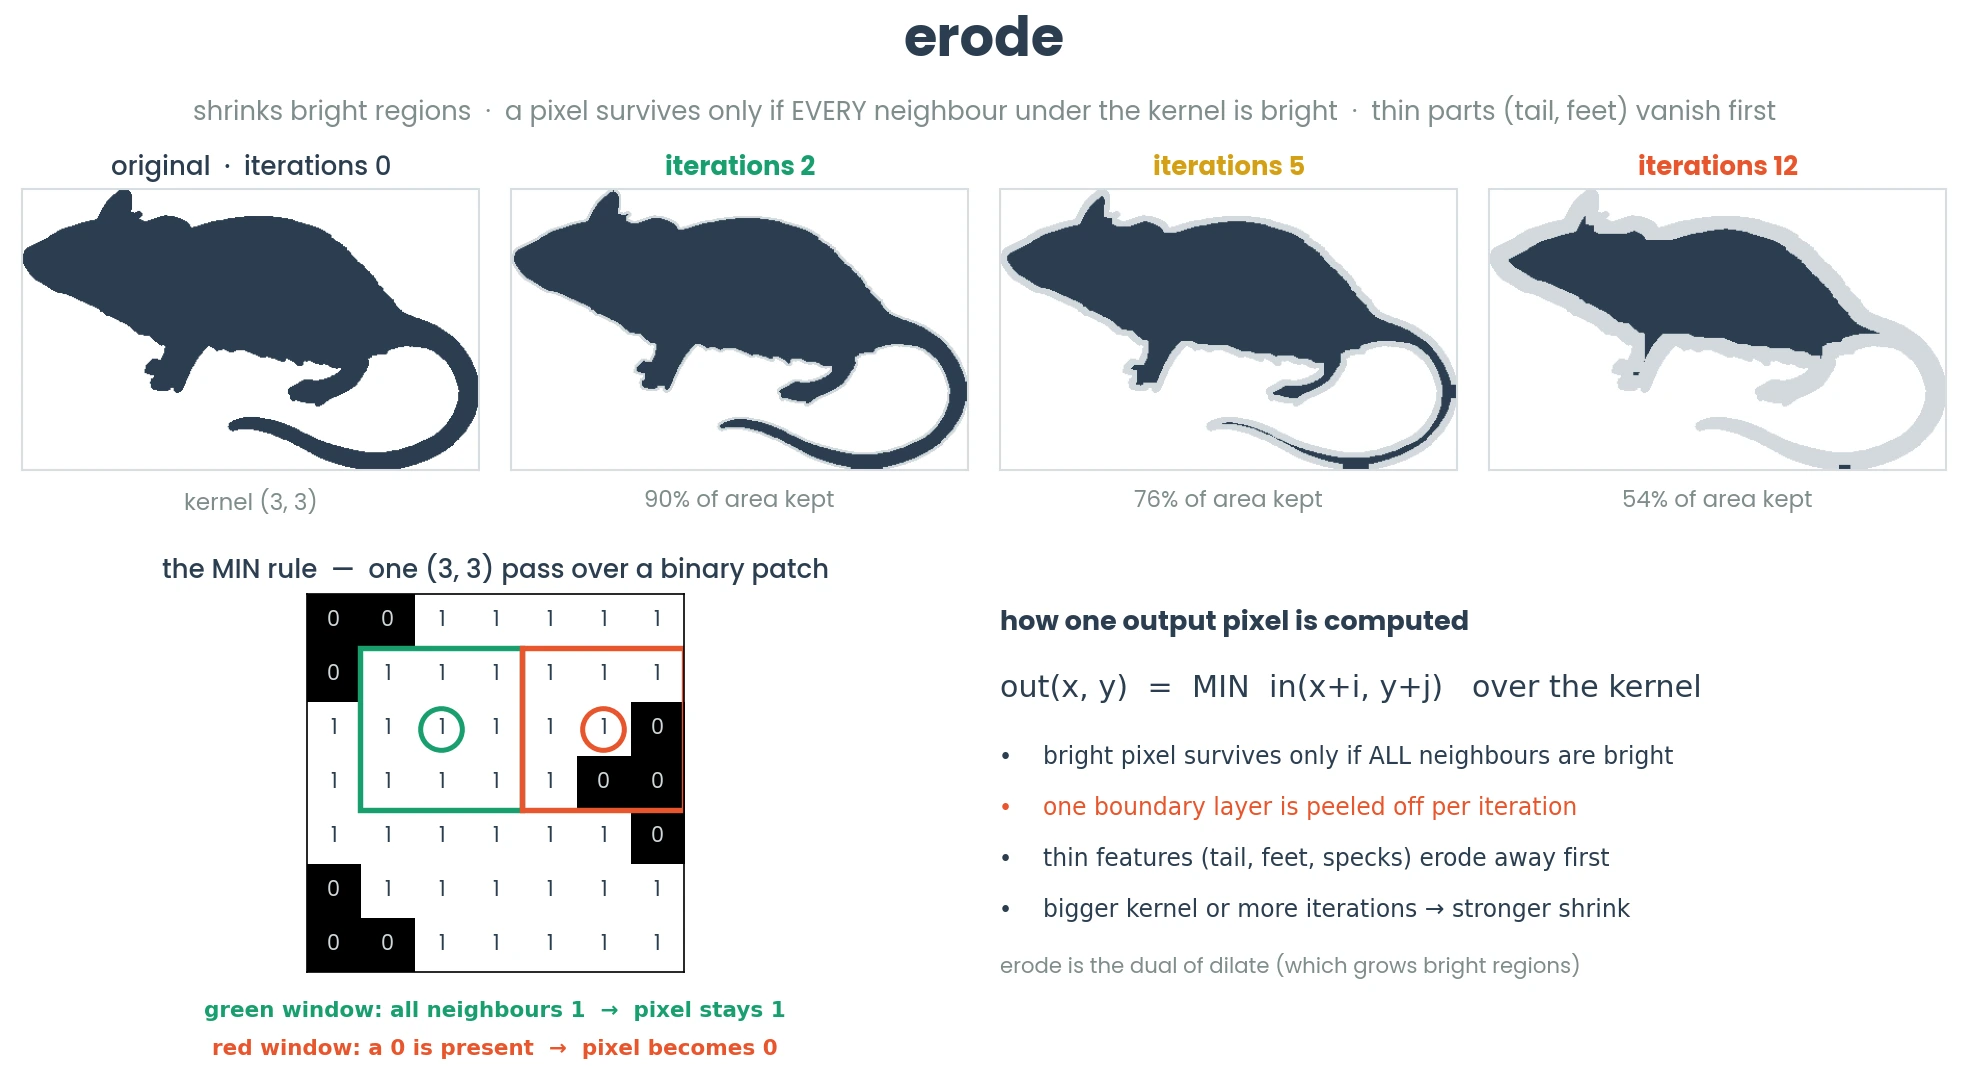
- static erode(img, kernel_size=(3, 3), iterations=3)[source]
Applies morphological erosion to the input image using the specified kernel size and number of iterations.
- Parameters
img (np.ndarray) – A 2D or 3D NumPy array representing the input image on which erosion will be applied. It should be in the form of a binary or greyscale image.
kernel_size (Optional[Tuple[int, int]]) – A tuple (width, height) specifying the size of the kernel to be used for erosion. The default kernel size is (3, 3).
iterations (Optional[int]) – The number of times the erosion operation is applied. The default value is 3.
- Returns
A NumPy array of the same shape as the input img representing the eroded image.
- Return type
np.ndarray
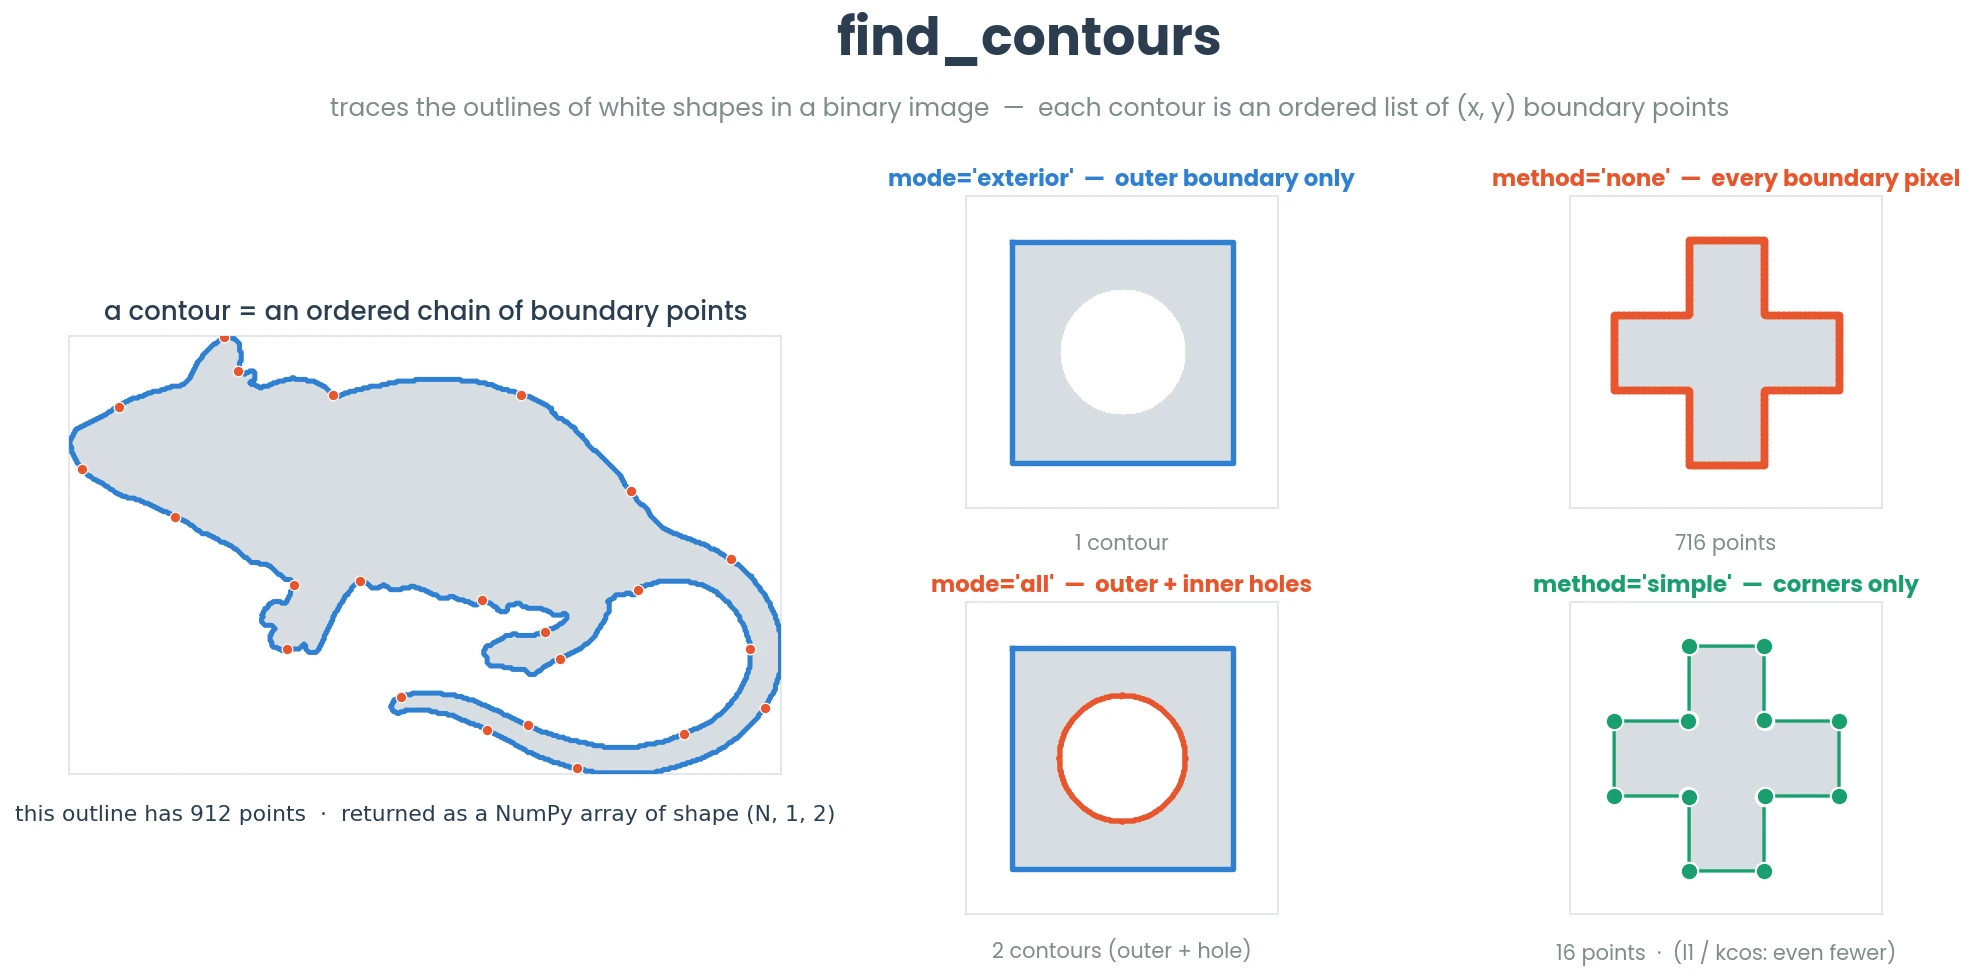
- static find_contours(img, mode='all', method='simple')[source]
Find contours in an image.
See also
For contour comparisons, see
simba.mixins.image_mixin.ImageMixin.get_contourmatch()- Parameters
img (np.ndarray) – Input image as a NumPy array.
mode (Optional[Literal['all', 'exterior']]) – Contour retrieval mode. E.g., which contours should be kept. Default is ‘all’.
'kcos']] (Optional[Literal['simple', 'none', 'l1',) – Contour approximation method. Default is ‘simple’.
- Return type
np.ndarray
- static find_first_non_uniform_clr_frm(video_path, start_idx=0, end_idx=None)[source]
Find the first frame of non-uniform color in a video.
Note
Helpful in the
simba.ui.px_to_mm_ui.GetPixelsPerMillimeterInterface()to ensure that a viable frame is pulled up.- Parameters
video_path (Union[str, os.PathLike, cv2.VideoCapture]) – The path to a video file on disk, or a cv2.VideoCapture object.
start_idx (Optional[int]) – The first frame (where to start searching for the non-uniform color image). Default: 0 which equals the first frame. None also equals start searching at the first frame.
end_idx (Optional[int]) – The last frame (where to end searching for the non-uniform color image). Default: None, which equals 1s into the video.
- Returns
The first non-uniform color image in the video as np.ndarray and the index of the first frame.
- Return type
np.ndarray
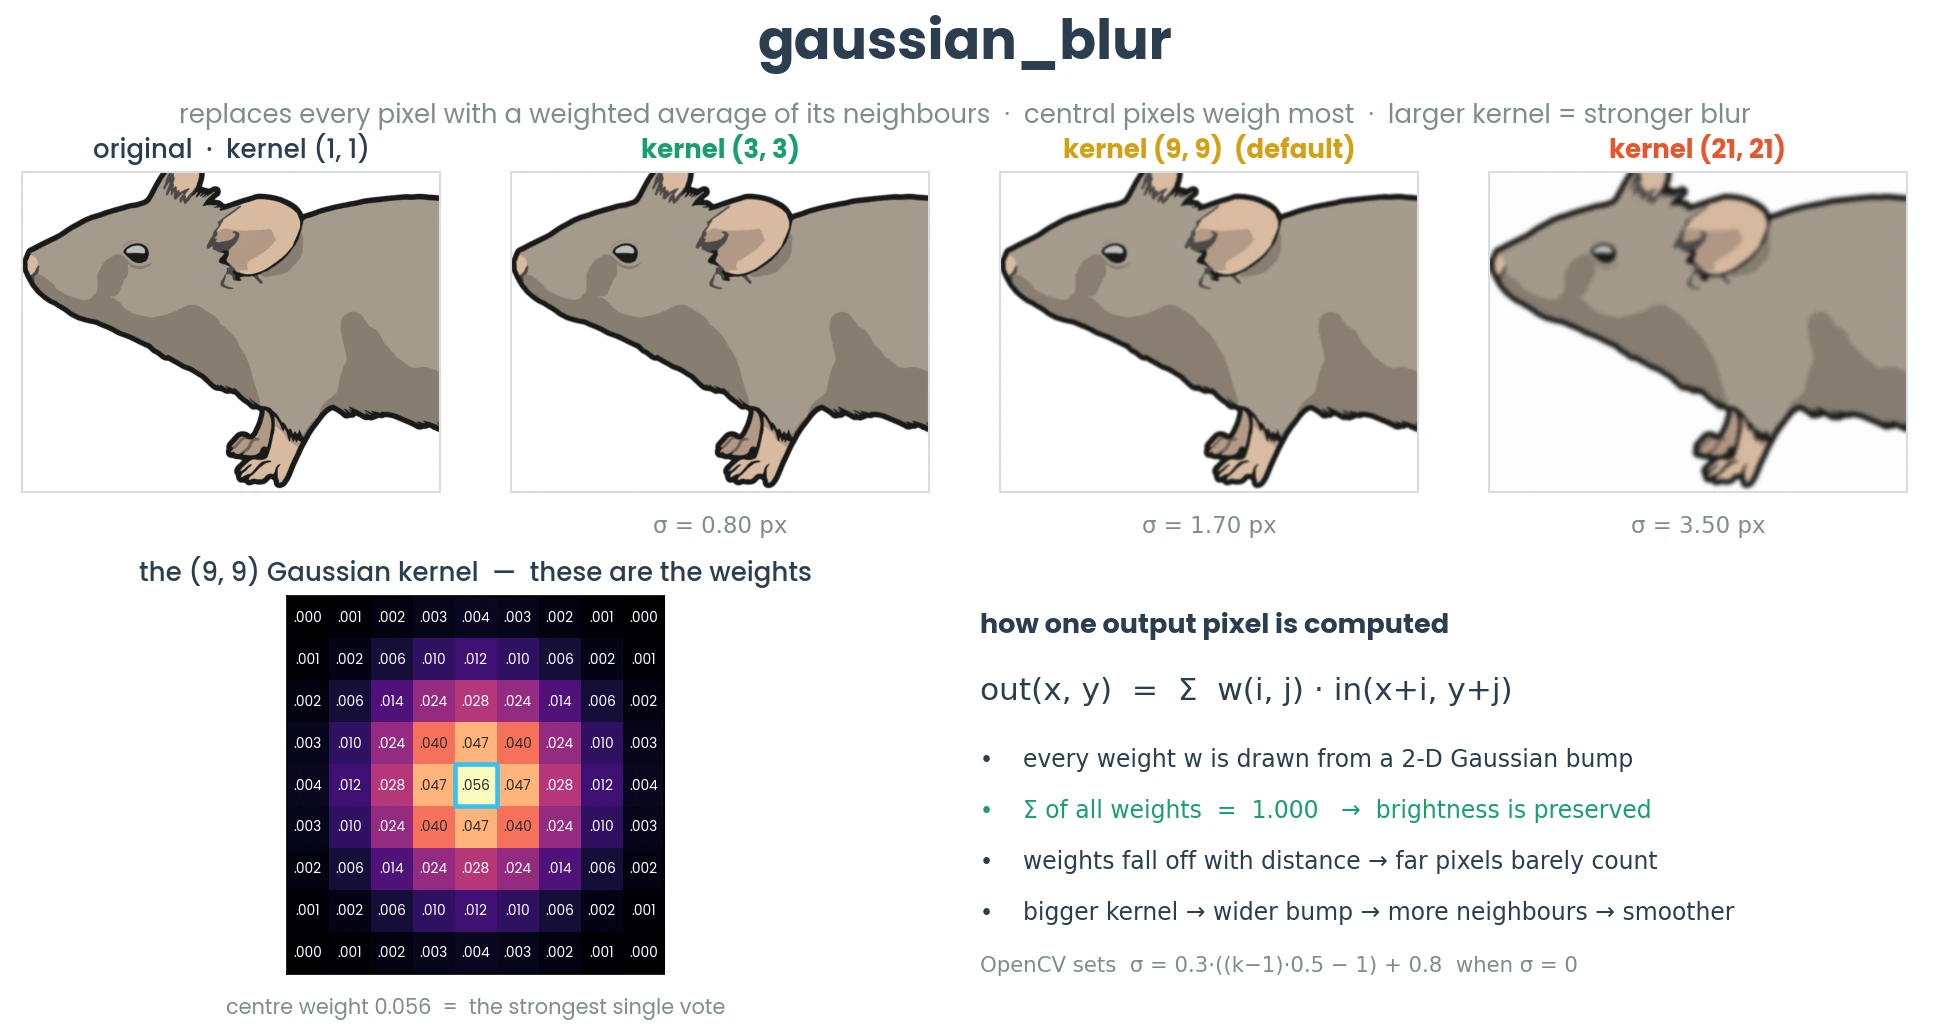
- static gaussian_blur(img, kernel_size=(9, 9))[source]
Applies a Gaussian blur to an input image using the specified kernel size.
Gaussian blurring is used to reduce image noise and detail by smoothing the image. It applies a weighted average where more importance is given to the central pixels, creating a soft blur effect.
- Parameters
img (np.ndarray) – Input image as a NumPy array. The image should be a valid 2D (grayscale) or 3D (color) array.
kernel_size (Optional[Tuple]) – A tuple (height, width) representing the size of the Gaussian kernel. The values must be positive odd integers. Default is (9, 9).
- Returns
A NumPy array representing the blurred image with the same dimensions as the input image.
- Return type
np.ndarray
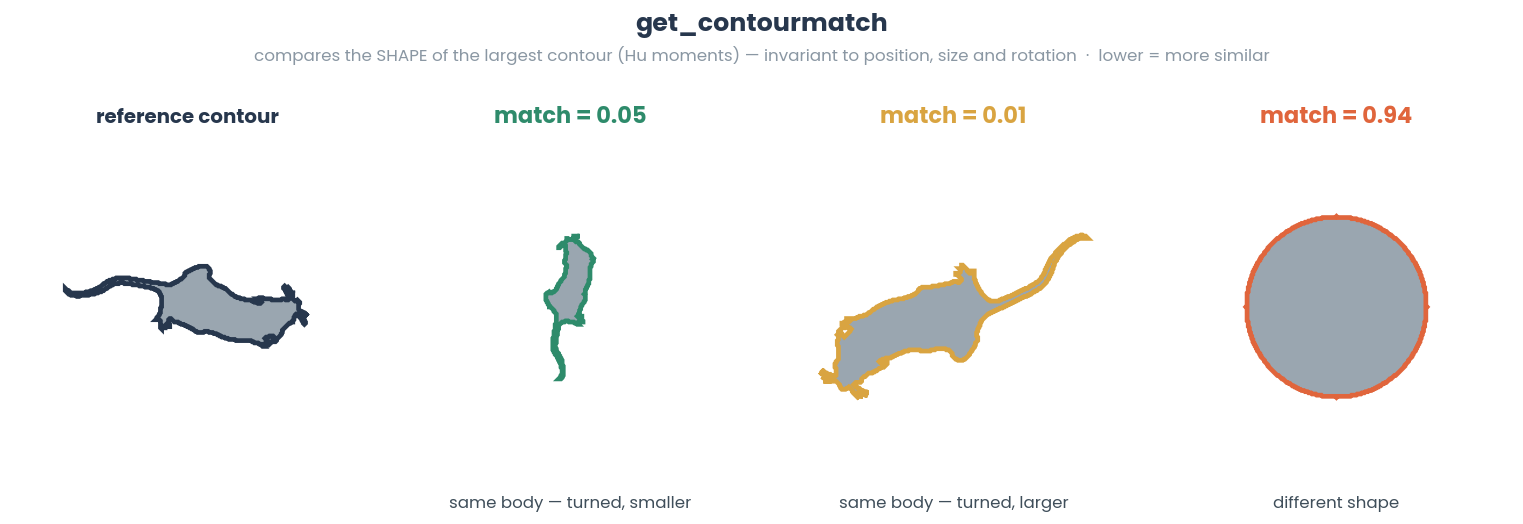
- static get_contourmatch(img_1, img_2, mode='all', method='simple', canny=True)[source]
Calculate contour similarity between two images.
- Parameters
img_1 (np.ndarray) – First input image (numpy array).
img_2 (np.ndarray) – Second input image (numpy array).
method (Optional[Literal['all', 'exterior']]) – Method for contour extraction. Options: ‘all’ (all contours) or ‘exterior’ (only exterior contours). Defaults to ‘all’.
- Returns
Contour similarity score between the two images. Lower values indicate greater similarity, and higher values indicate greater dissimilarity.
- Return type
- Example
>>> img_1 = cv2.imread('/Users/simon/Desktop/envs/troubleshooting/khan/project_folder/videos/stitched_frames/0.png').astype(np.uint8)
>>> img_2 = cv2.imread('/Users/simon/Desktop/envs/troubleshooting/khan/project_folder/videos/stitched_frames/3.png').astype(np.uint8)
>>> ImageMixin.get_contourmatch(img_1=img_1, img_2=img_2, method='exterior')
- static get_histocomparison(img_1, img_2, method='correlation', absolute=True)[source]
Compare histograms of two images using OpenCV’s histogram comparison methods.
Each image is reduced to a normalized intensity histogram (256 bins per channel) and the two histograms are compared with the chosen method. Because only the distribution of intensities is compared, the score is blind to where pixels sit (a spatially shuffled image scores identically) and to image content (two different images with similar tone distributions score as alike).
The “more similar” direction depends on the method: for
correlationandintersectionhigher values indicate greater similarity, while forchi_squareandbhattacharyya/hellingerlower values (0 = identical) indicate greater similarity.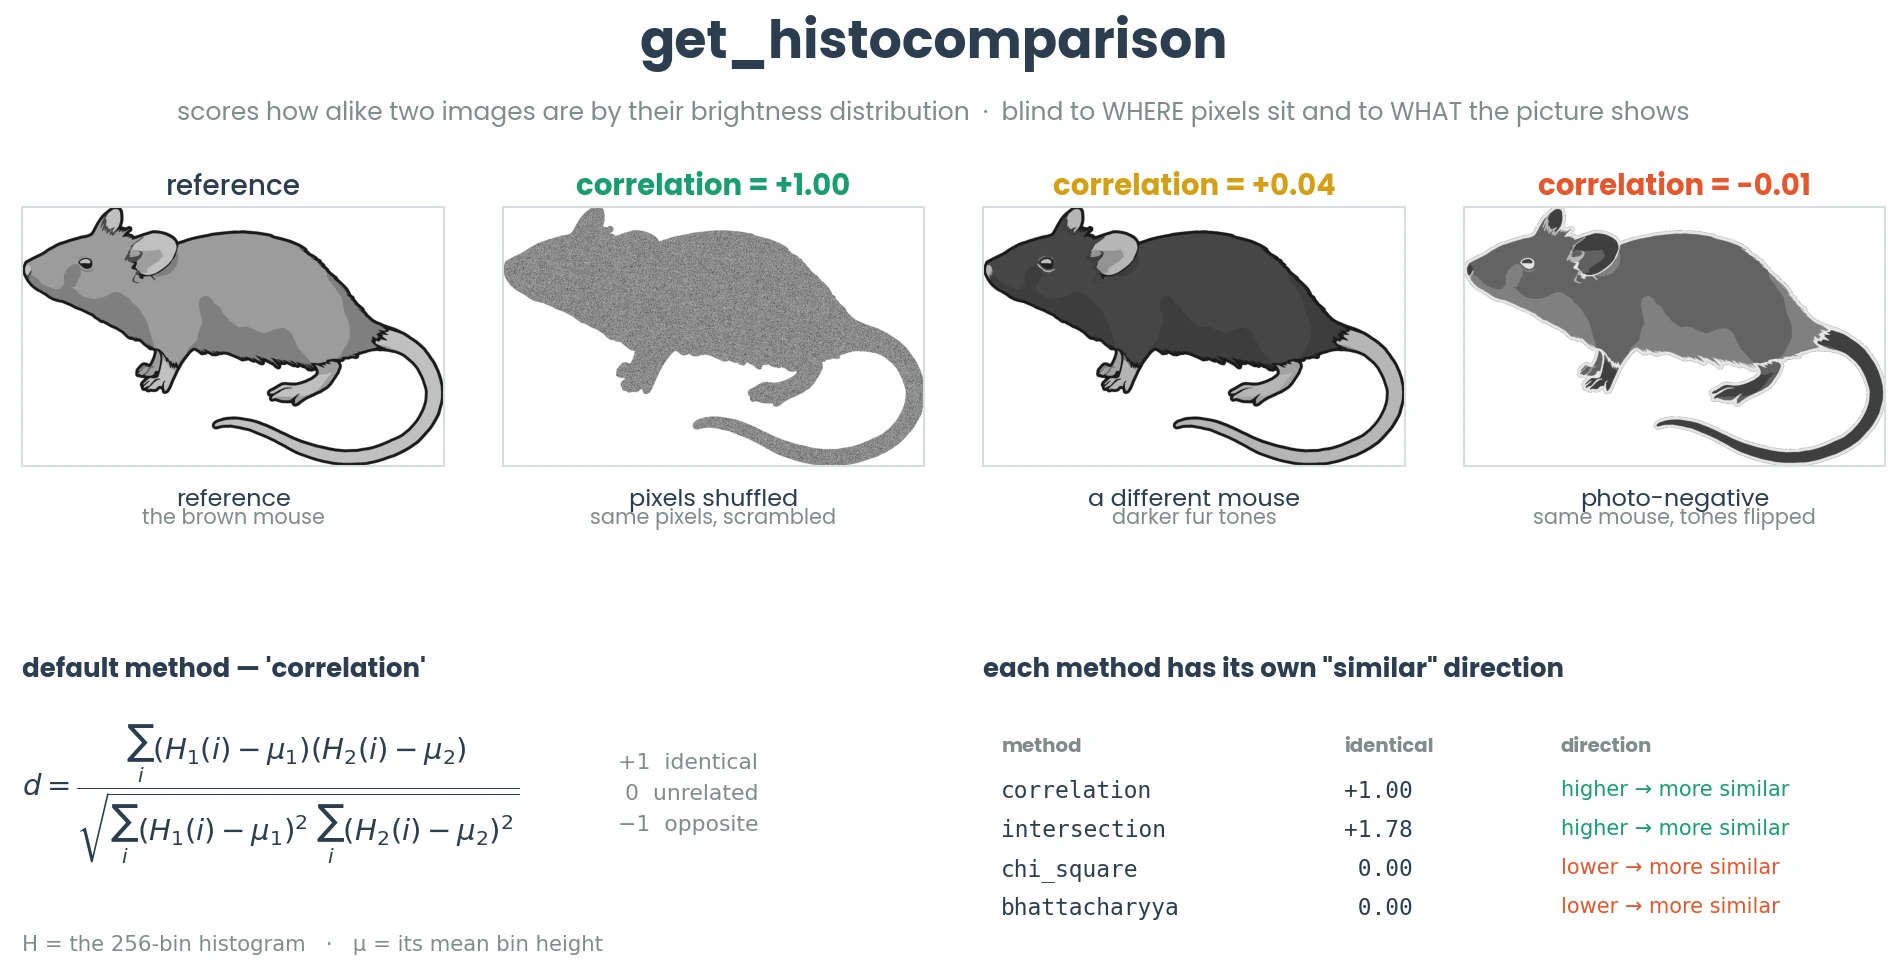
See also
For histogram comparison within specific geometries, see
simba.mixins.geometry_mixin.GeometryMixin.geometry_histocomparison().- Parameters
img_1 (np.ndarray) – First input image as a numpy array.
img_2 (np.ndarray) – Second input image as a numpy array.
method (Optional[Literal['chi_square', 'correlation', 'intersection', 'bhattacharyya', 'hellinger', 'chi_square_alternative', 'kl_divergence']]) – Histogram comparison method. Default: ‘correlation’.
absolute (Optional[bool]) – If True, returns the absolute value of the comparison result. Default: True.
- Returns
Histogram comparison score between the two images.
- Return type
- Example
>>> img_1 = cv2.imread('/Users/simon/Desktop/envs/troubleshooting/khan/project_folder/videos/stitched_frames/0.png').astype(np.uint8)
>>> img_2 = cv2.imread('/Users/simon/Desktop/envs/troubleshooting/khan/project_folder/videos/stitched_frames/3.png').astype(np.uint8)
>>> ImageMixin.get_histocomparison(img_1=img_1, img_2=img_2, method='chi_square_alternative')
- static get_timelapse_img(video_path, frame_cnt=25, size=None, crop_ratio=50)[source]
Creates timelapse image from video.

- Parameters
video_path (Union[str, os.PathLike]) – Path to the video to cerate the timelapse image from.
frame_cnt (int) – Number of frames to grab from the video. There will be an even interval between each frame.
size (Optional[int]) – The total width in pixels of the final timelapse image. If None, uses the video width (adjusted for crop_ratio).
crop_ratio (int) – The percent of each original video (from the left) to show.
- Return np.ndarray
The timelapse image as a numpy array
- Example
>>> img = ImageMixin.get_timelapse_img(video_path=r"E: roubleshooting\mitra_emergence\project_folder\clip_test\Box1_180mISOcontrol_Females_clipped_progress_bar.mp4", size=100)
- static img_diff(x, y, threshold, method='absolute')[source]
Computes the difference between two images using the specified method and applies a threshold to produce a binary image.
Note
Haven’t explored
methodparameter much. But included it to mirror the parameter used in EzTrack.- Parameters
x (np.ndarray) – The first input image as a NumPy array.
y (np.ndarray) – The second input image as a NumPy array.
threshold (int) – The pixel intensity threshold for binarizing the difference image (range: 1-255).
method (str) – The method to compute the difference. Options are: - ‘absolute’: Uses OpenCV’s absdiff function. - ‘light’: Computes absolute difference with potential overexposure handling. - ‘dark’: Computes absolute difference with potential underexposure handling.
- Returns
A binary image (NumPy array) where pixel values are either 255 (significant difference) or 0 (insignificant difference).
- Return type
np.ndarray
References
- 1
Pennington et al. “eztrack: An open-source video analysis pipeline for the investigation of animal behavior”. Scientific Reports (2019) 9:19979 | https://doi.org/10.1038/s41598-019-56408-9
- Example
>>> img1 = np.random.randint(0, 255, (100, 100, 3), dtype=np.uint8)
>>> img2 = np.random.randint(0, 255, (100, 100, 3), dtype=np.uint8)
>>> result = ImageMixin.img_diff(img1, img2, threshold=50, method='absolute')
- static img_emd(imgs=None, img_1=None, img_2=None, lower_bound=0.5, verbose=False)[source]
Compute Wasserstein distance between two images represented as numpy arrays.
\[EMD(P, Q) = \inf_{\gamma \in \Gamma(P, Q)} \int |x - y| d\gamma(x, y)\]where \(P\) and \(Q\) are the distributions (image histograms), and \(\Gamma(P, Q)\) represents the set of all possible joint distributions between \(P\) and \(Q\). The goal is to minimize the cost of transforming \(P\) into \(Q\).
Note
Long runtime for larger images. Consider down-sampling videos / images before caluclating wasserstein / earth mover distances.

- Parameters
imgs (List[np.ndarray]) – A list containing two images as NumPy arrays. Alternatively, you can pass img_1 and img_2 directly.
img_1 (Optional[np.ndarray]) – The first image (optional if imgs is provided).
img_2 (Optional[np.ndarray]) – The second image (optional if imgs is provided).
lower_bound (Optional[float]) – Lower bound on the EMD computation. Default is 0.5.
verbose (Optional[bool]) – If True, prints additional information such as elapsed time.
- Returns
The Earth Mover’s Distance (Wasserstein distance) between the two images.
- Return type
- Example
>>> img_1 = cv2.imread('/Users/simon/Desktop/envs/troubleshooting/Emergence/project_folder/videos/Example_1_frames/24.png', 0).astype(np.float32)
>>> img_2 = cv2.imread('/Users/simon/Desktop/envs/troubleshooting/Emergence/project_folder/videos/Example_1_frames/1984.png', 0).astype(np.float32)
>>> ImageMixin.img_emd(img_1=img_1, img_2=img_2, lower_bound=0.5)
>>> 10.658767700195312
- static img_matrix_mse(imgs)[source]
Compute the mean squared error (MSE) matrix table for a stack of images.
This function calculates the MSE between each pair of images in the input array and returns a symmetric matrix where each element (i, j) represents the MSE between the i-th and j-th images. Useful for image similarities and anomalities.

See also
For time-series and GPU acceleration, see
simba.data_processors.cuda.image.stack_sliding_mse(). For time-series and multicore CPU solution, seesimba.mixins.image_mixin.ImageMixin.img_sliding_mse()To compare two images, seesimba.mixins.image_mixin.ImageMixin.img_stack_mse()- Parameters
imgs (np.ndarray) – A stack of images represented as a numpy array.
- Returns
The MSE matrix table.
- Return type
np.ndarray
- Example
>>> imgs = ImageMixin().read_img_batch_from_video(video_path='/Users/simon/Desktop/envs/troubleshooting/two_black_animals_14bp/videos/Together_1.avi', start_frm=0, end_frm=50)
>>> imgs = np.stack(list(imgs.values()))
>>> ImageMixin().img_matrix_mse(imgs=imgs)
- static img_moments(img, hu_moments=False)[source]
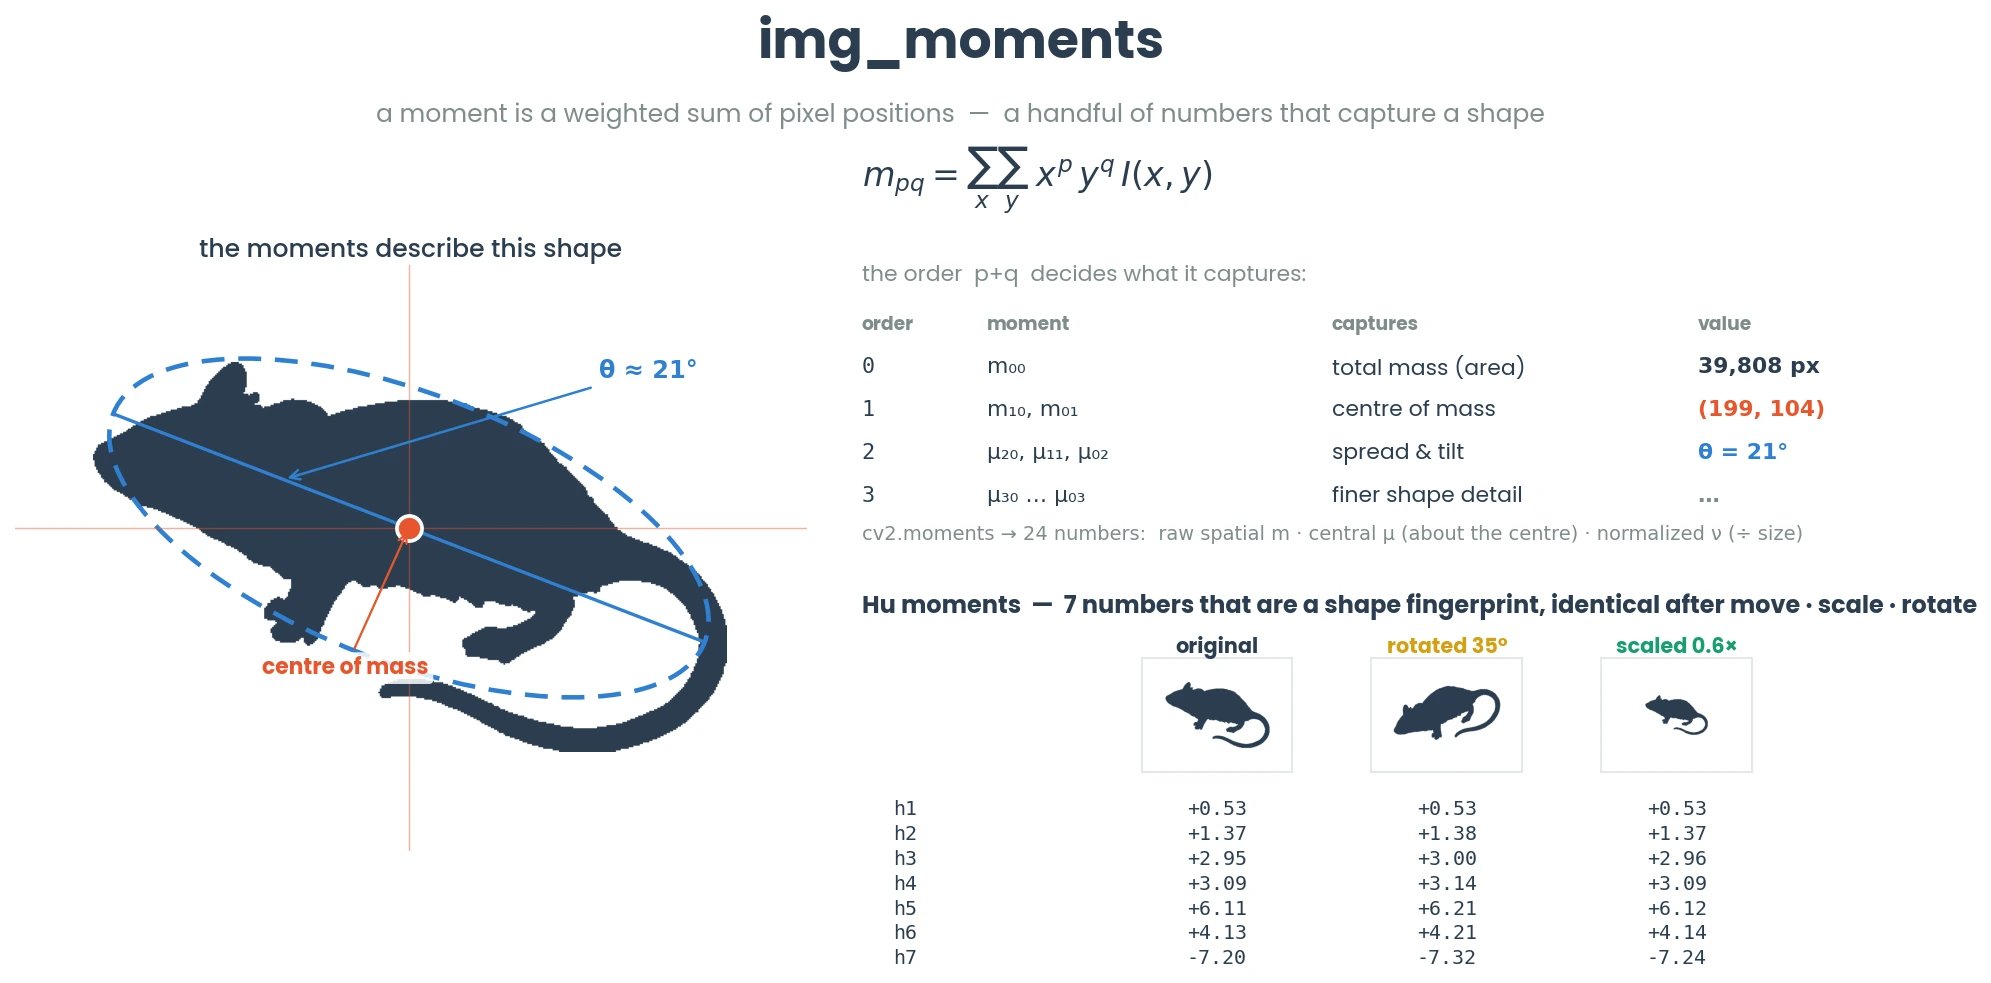
Compute image moments or Hu moments from the given image.
Image moments are statistical properties of an image that provide information about its shape and structure. Hu moments are a set of seven invariant moments used for image pattern recognition, which are invariant to image transformations such as scaling, translation, and rotation.
Note
See wiki ` https://en.wikipedia.org/wiki/Image_moment#Hu_invariant_moments <See https://en.wikipedia.org/wiki/Image_moment#Hu_invariant_moments>`__.
- Parameters
img (np.ndarray) – The input image as a 2D or 3D NumPy array. If the image has multiple channels (e.g., RGB or BGR), it will be converted to grayscale.
hu_moments (Optional[bool]) – If set to True, the function computes and returns the 7 Hu moments. If False, it returns the standard moments of the image. Default is False.
- Returns
A 24x1 2D-array if hu_moments is False (representing standard moments), or a 7x1 2D-array if hu_moments is True (representing Hu moments).
- Return type
np.ndarray
- Example
>>> img_1 = cv2.imread('/Users/simon/Desktop/envs/troubleshooting/khan/project_folder/videos/stitched_frames/0.png').astype(np.uint8)
>>> ImageMixin.img_moments(img=img_1, hu_moments=True)
>>> [[ 1.01270313e-03], [ 8.85983106e-10], [ 4.67680675e-13], [ 1.00442018e-12], [-4.64181508e-25], [-2.49036749e-17], [ 5.08375216e-25]]
- static img_sliding_mse(imgs, slide_length=1.0, sample_rate=1.0)[source]
Jitted compute the mean squared error (MSE) between pairs of images in a sliding window manner.
This function performs pairwise comparisons of images using mean squared errors (MSE). It slides a window of the specified size over the sequence of images and computes the MSE between each image and the image that is slide_size positions before it.
See also
For GPU acceleration, see
simba.data_processors.cuda.image.stack_sliding_mse(). To compare images in two stacks, seesimba.mixins.image_mixin.ImageMixin.img_stack_mse()
- Parameters
imgs – 3d or 4d A numpy array of images.
slide_size – The size of the sliding window (default is 1).
- Returns
A numpy array of MSE values for each pair of images in the sliding window.
- Return type
np.ndarray
- Example
>>> imgs = ImageMixin().read_all_img_in_dir(dir='/Users/simon/Desktop/envs/troubleshooting/two_black_animals_14bp/project_folder/Together_4_cropped_frames')
>>> imgs = np.stack(imgs.values())
>>> mse = ImageMixin().img_sliding_mse(imgs=imgs, slide_length=2)
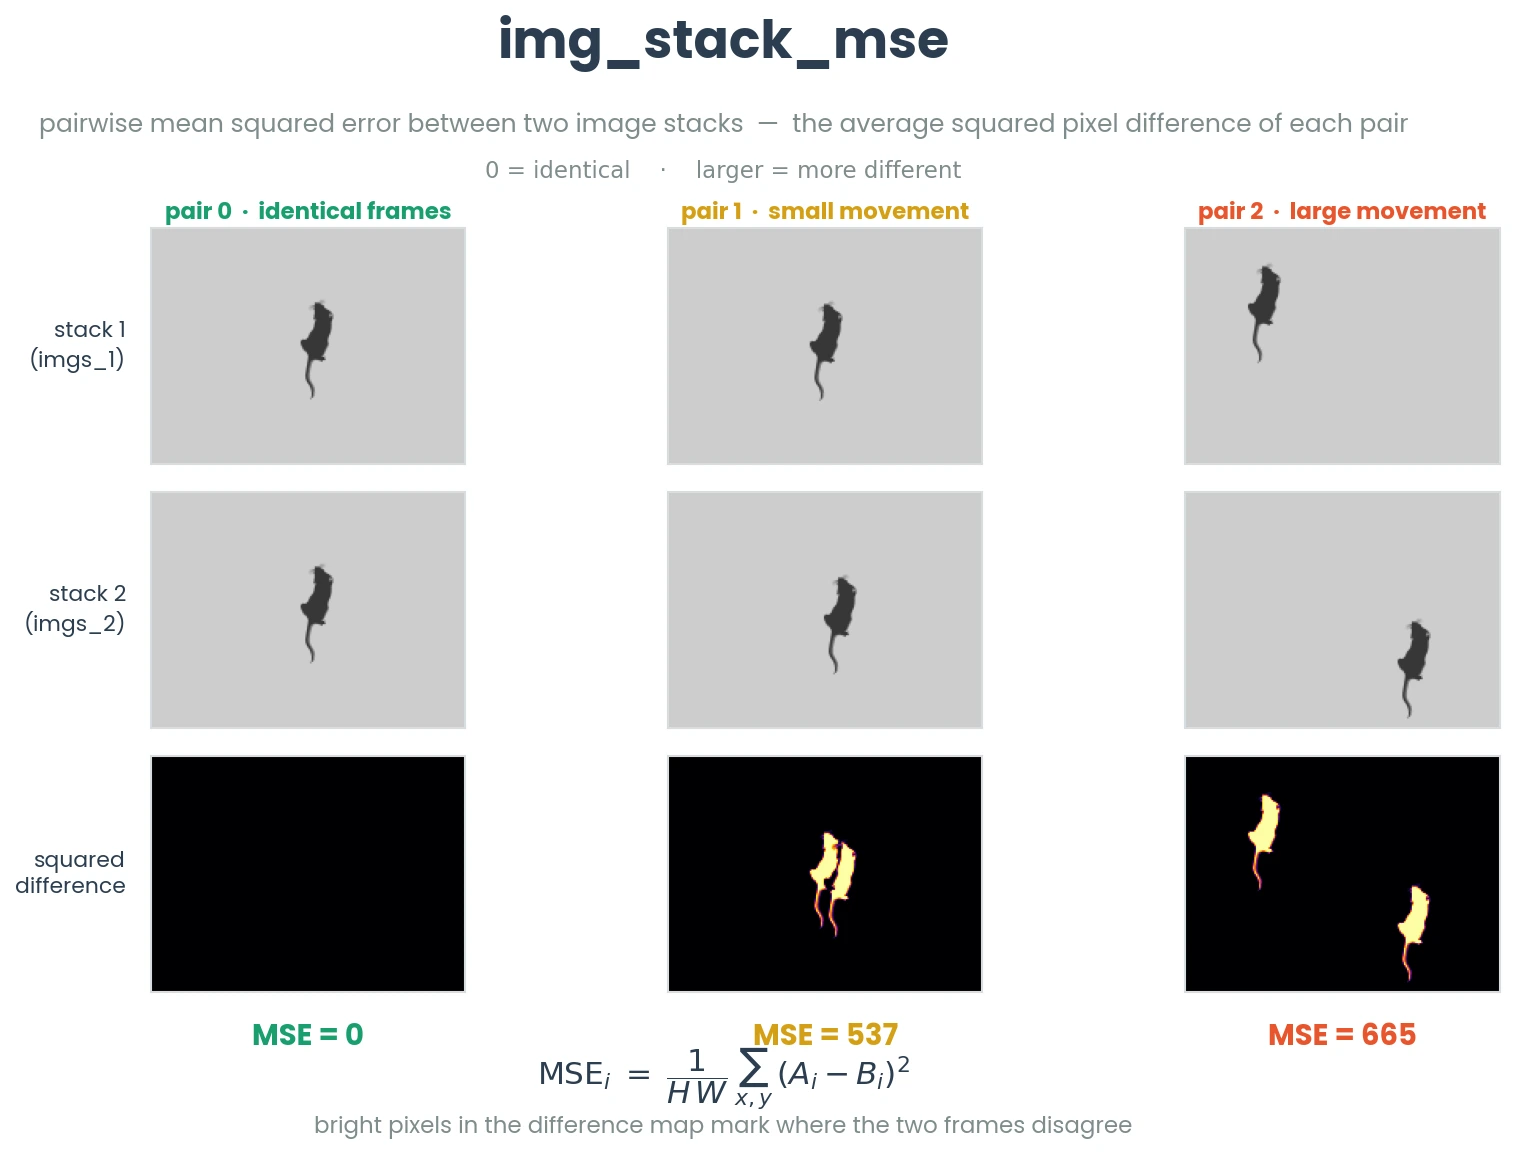
- static img_stack_mse(imgs_1, imgs_2)[source]
Jitted pairwise comparison of images in two stacks of equal length using mean squared errors.
Note
Useful for noting subtle changes, each imgs_2 equals imgs_1 with images shifted by 1. Images has to be in uint8 format. Also see
img_sliding_mse.See also
For time-series comparison and GPU acceleration, see
simba.data_processors.cuda.image.stack_sliding_mse(). For time-series comparison and multicore acceleration, see:func:simba.mixins.image_mixin.ImageMixin.img_sliding_mse- Parameters
imgs_1 (np.ndarray) – First three (non-color) or four (color) dimensional stack of images in array format.
imgs_2 (np.ndarray) – Second three (non-color) or four (color) dimensional stack of images in array format.
- Returns
Array of size len(imgs_1) comparing
imgs_1andimgs_2at each index using mean squared errors at each pixel location.- Return type
np.ndarray
- Example
>>> img_1 = cv2.imread('/Users/simon/Desktop/envs/troubleshooting/khan/project_folder/videos/stitched_frames/0.png').astype(np.uint8)
>>> img_2 = cv2.imread('/Users/simon/Desktop/envs/troubleshooting/khan/project_folder/videos/stitched_frames/10.png').astype(np.uint8)
>>> imgs_1 = np.stack((img_1, img_2)); imgs_2 = np.stack((img_2, img_2))
>>> ImageMixin.img_stack_mse(imgs_1=imgs_1, imgs_2=imgs_2)
>>> [637,   0]
>>> imgs = ImageMixin().read_all_img_in_dir(dir='/Users/simon/Desktop/envs/troubleshooting/two_black_animals_14bp/project_folder/Together_4_cropped_frames')
>>> imgs_1 = np.stack(imgs.values())
>>> imgs_2 = np.roll(imgs_1,-1, axis=0)
>>> mse = ImageMixin().img_stack_mse(imgs_1=imgs_1, imgs_2=imgs_1)
- static img_stack_to_bw(imgs, lower_thresh, upper_thresh, invert)[source]
Convert a stack of color images into black and white format.
Note
If converting a single image, consider
simba.mixins.image_mixin.ImageMixin.img_to_bw(). For GPU acceleration, seesimba.data_processors.cuda.image.img_stack_to_bw().- Parameters
img (np.ndarray) – 4-dimensional array of color images.
lower_thresh (Optional[int]) – Lower threshold value for binary conversion. Pixels below this value become black. Default is 20.
upper_thresh (Optional[int]) – Upper threshold value for binary conversion. Pixels above this value become white. Default is 250.
invert (Optional[bool]) – Flag indicating whether to invert the binary image (black becomes white and vice versa). Default is True.
- Return np.ndarray
4-dimensional array with black and white image.
- Example
>>> imgs = ImageMixin.read_img_batch_from_video(video_path='/Users/simon/Downloads/3A_Mouse_5-choice_MouseTouchBasic_a1.mp4', start_frm=0, end_frm=100)
>>> imgs = np.stack(imgs.values(), axis=0)
>>> bw_imgs = ImageMixin.img_stack_to_bw(imgs=imgs, upper_thresh=255, lower_thresh=20, invert=False)
- static img_stack_to_greyscale(imgs)[source]
Jitted conversion of a 4D stack of color images (RGB format) to grayscale.

See also
For CuPy based GPU acceleration, see
simba.data_processors.cuda.image.img_stack_to_grayscale_cupy()For numba CUDA based GPU acceleration, seesimba.data_processors.cuda.image.img_stack_to_grayscale_cuda()For single image conversion, seesimba.mixins.image_mixin.ImageMixin.img_to_greyscale()- Parameters
imgs (np.ndarray) – A 4D array representing color images. It should have the shape (num_images, height, width, 3) where the last dimension represents the color channels (R, G, B).
- Returns
A 3D array containing the grayscale versions of the input images. The shape of the output array is (num_images, height, width).
- Return type
np.ndarray
- Example
>>> imgs = ImageMixin().read_img_batch_from_video( video_path='/Users/simon/Desktop/envs/troubleshooting/two_black_animals_14bp/videos/Together_1.avi', start_frm=0, end_frm=100)
>>> imgs = np.stack(list(imgs.values()))
>>> imgs_gray = ImageMixin.img_stack_to_greyscale(imgs=imgs)
- static img_stack_to_video(imgs, fps, save_path, verbose=True)[source]
Convert a dictionary of images into a video file.
Note
The input dictionary
imgscan be created withsimba.mixins.ImageMixin.slice_shapes_in_imgs.See also
For GPU acceleration, see
simba.utils.read_write.img_stack_to_video().- Parameters
imgs (Dict[int, np.ndarray]) – A dictionary containing frames of the video, where the keys represent frame indices and the values are numpy arrays representing the images.
save_path (Union[str, os.PathLike]) – The path to save the output video file.
verbose (Optional[bool]) – If True, prints progress messages. Defaults to True.
- static img_to_bw(img, lower_thresh=20, upper_thresh=250, invert=True)[source]
Convert an image to black and white (binary).

See also
If converting multiple images from colour to black and white, consider
simba.mixins.image_mixin.ImageMixin.img_stack_to_bw()for multi-core method orsimba.data_processors.cuda.image.img_stack_to_bw()for GPU acceleration.- Parameters
img (np.ndarray) – Input image as a NumPy array.
lower_thresh (Optional[int]) – Lower threshold value for binary conversion. Pixels below this value become black. Default is 20.
upper_thresh (Optional[int]) – Upper threshold value for binary conversion. Pixels above this value become white. Default is 250.
invert (Optional[bool]) – Flag indicating whether to invert the binary image (black becomes white and vice versa). Default is True.
- Returns
Binary black and white image.
- Return type
np.ndarray
- static img_to_greyscale(img)[source]
Convert a single color image to greyscale.
The function takes an RGB image and converts it to a greyscale image using a weighted sum approach. If the input image is already in greyscale (2D array), it is returned as is.
See also
For CuPy based GPU acceleration, see
simba.data_processors.cuda.image.img_stack_to_grayscale_cupy()For numba CUDA based GPU acceleration, seesimba.data_processors.cuda.image.img_stack_to_grayscale_cuda()For numba based multicore solution, seesimba.mixins.image_mixin.ImageMixin.img_stack_to_greyscale()- Parameters
img (np.ndarray) – Input image represented as a NumPy array. For a color image, the array should have three channels (RGB).
- Returns
The greyscale image as a 2D NumPy array.
- Return type
np.ndarray
- static is_video_color(video)[source]
Determines whether a video is in color or greyscale.
- Parameters
video (Union[str, os.PathLike, cv2.VideoCapture]) – The video source, either a cv2.VideoCapture object or a path to a file on disk.
- Returns
Returns True if the video is in color (has more than one channel), and False if the video is greyscale (single channel).
- Return type
- static non_local_mean_denoising_image(img, sigma=30, template_window=0.02, search_window=0.1)[source]
Applies Non-Local Means (NLM) denoising to a grayscale or color image using OpenCV.
Note
Pretty slow.

- Parameters
img (np.ndarray) – Input image (grayscale or color) as a NumPy array.
sigma (int) – Strength of the filter. Higher values remove more noise but may blur details. Default 30.
template_window (float) – Size of the local patch for denoising, relative to the larger image dimension. Must be between 1e-5 and 1.0. Default is 0.02.
search_window (float) – Size of the area where similar patches are searched, relative to the larger image dimension. Must be between 1e-5 and 1.0. Default is 0.10.
- Returns
Denoised image as a NumPy array with the same shape as the input.
- Return type
np.ndarray
- static non_local_mean_denoising_sequence(imgs, sigma=30, img_to_denoise_idx=None)[source]
Applies Non-Local Means (NLM) denoising to a stack of images or video frames to reduce noise, using a temporal window for multi-frame denoising.
Note
Pretty slow.
See also
For single images, see
non_local_mean_denoising_image()- Parameters
imgs (np.ndarray) – A 3D or 4D NumPy array of images or video frames. If the input is a 3D array, it represents a single image stack (height, width, num_frames). If the input is a 4D array, it represents a batch of video frames (num_frames, height, width, num_channels).
sigma (int) – The filtering strength parameter. A higher value corresponds to stronger denoising and more smoothing of the image. The default is 30.
- Returns
Denoised video or image stack.
- Return type
np.ndarray If input is a 3D array (grayscale), the output is a 3D array. If input is a 4D array (colored), the output is a 4D arra
- static orb_matching_similarity_(img_1, img_2, method='knn', mask=None, threshold=0.75)[source]
Perform ORB feature matching between two sets of images.
>>> img_1 = cv2.imread('/Users/simon/Desktop/envs/troubleshooting/khan/project_folder/videos/stitched_frames/0.png').astype(np.uint8)
>>> img_2 = cv2.imread('/Users/simon/Desktop/envs/troubleshooting/khan/project_folder/videos/stitched_frames/10.png').astype(np.uint8)
>>> ImageMixin().orb_matching_similarity_(img_1=img_1, img_2=img_2, method='radius')
>>> 4
- static pad_img_stack(image_dict, pad_value=0)[source]
Pad images in a dictionary stack to have the same dimensions (the same dimension is represented by the largest image in the stack)

See also
To read in a dictionary of images from a video using GPU acceleration, see
simba.utils.read_write.read_img_batch_from_video_gpu()To read in a dictionary of images from a video using multicore acceleration, seesimba.mixins.image_mixin.ImageMixin.read_img_batch_from_video()To read in a dictionary of images from a directory using multicore acceleration, usesimba.mixins.image_mixin.ImageMixin.read_all_img_in_dir()- Parameters
- Returns
A dictionary mapping integer keys to numpy arrays representing padded images.
- Return type
Dict[int, np.ndarray]
- static read_all_img_in_dir(dir, core_cnt=- 1)[source]
Helper to read in all images within a directory using multiprocessing.
- Parameters
dir (Union[str, os.PathLike]) – Diretory holding the input images.
core_cnt (Optional[int]) – Number of CPU cores to use to read in images. Default to
-1denoting all available cores.
- Returns
Returns a dictionary with the image name as key and the images in array format as values.
- Return type
Dict[str, np.ndarray]
- Example
>>> imgs = ImageMixin().read_all_img_in_dir(dir='/Users/simon/Desktop/envs/troubleshooting/two_black_animals_14bp/project_folder/Together_4_cropped_frames')
- static read_img_batch_from_video(video_path, start_frm, end_frm, greyscale=False, black_and_white=False, core_cnt=- 1, verbose=False)[source]
Read a batch of frames from a video file. This method reads frames from a specified range of frames within a video file using multiprocessing.
See also
For GPU acceleration, see
simba.utils.read_write.read_img_batch_from_video_gpu()Note
When black-and-white videos are saved as MP4, there can be some small errors in pixel values during compression. A video with only (0, 255) pixel values therefore gets other pixel values, around 0 and 255, when read in again. If you expect that the video you are reading in is black and white, set
black_and_whiteto True to round any of these wonly value sto 0 and 255.- Parameters
video_path (Union[str, os.PathLike]) – Path to the video file.
start_frm (int) – Starting frame index.
end_frm (int) – Ending frame index.
core_cnt (Optionalint]) – Number of CPU cores to use for parallel processing. Default is -1, indicating using all available cores.
greyscale (Optional[bool]) – If True, reads the images as greyscale. If False, then as original color scale. Default: False.
black_and_white (bool) – If True, returns the images in black and white. Default False.
- Returns
A dictionary containing frame indices as keys and corresponding frame arrays as values.
- Return type
Dict[int, np.ndarray]
- Example
>>> ImageMixin().read_img_batch_from_video(video_path='/Users/simon/Desktop/envs/troubleshooting/two_black_animals_14bp/videos/Together_1.avi', start_frm=0, end_frm=50)
- static resize_img_dict(imgs, size, interpolation=1)[source]
Resize a dictionary of images to a specified size.
See also
To read in a dictionary of images from a video using GPU acceleration, see
simba.utils.read_write.read_img_batch_from_video_gpu()To read in a dictionary of images from a video using multicore acceleration, seesimba.mixins.image_mixin.ImageMixin.read_img_batch_from_video()To read in a dictionary of images from a directory using multicore acceleration, usesimba.mixins.image_mixin.ImageMixin.read_all_img_in_dir()- Parameters
imgs (Dict[str, np.ndarray]) – A dictionary where keys are image names (strings) and values are NumPy arrays representing the images.
size (Union[Literal['min', 'max'], Tuple[int, int]]) – The target size for the resizing operation. It can be: - ‘min’: Resize all images to the smallest height and width found among the input images. - ‘max’: Resize all images to the largest height and width found among the input images. - Tuple of two integers (height, width): Explicitly specify the target size for all images.
interpolation – Interpolation method to use for resizing. This can be one of OpenCV’s interpolation methods.
- Returns
A dictionary of resized images, where the keys match the original dictionary, and the values are the resized images as NumPy arrays.
- Return type
Dict[str, np.ndarray]
- static resize_img_stack(imgs, scale_factor=0.5)[source]
Resizes a stack of images by applying a scaling factor to each image in the stack. Uses bilinear interpolation.
Note
Pass gresyscale images.
- Parameters
imgs (np.ndarray) – 3D numpy array of shape (N, H, W). All images are expected to have the same shape.
scale_factor (float) – A float that determines the scaling factor for resizing each image. A value of 0.5 will reduce the size by half.
- Returns
A 3D numpy array of the resized images, with shape (N, Nh, Nw), where Nh and Nw are the new height and width calculated by applying the scale_factor to the original height and width.
- Return type
np.ndarray
- Example
>>> VIDEO_PATH = r"D:/EPM_2/EPM_1.mp4"
>>> img = read_img_batch_from_video(video_path=VIDEO_PATH, greyscale=True, start_frm=0, end_frm=15, core_cnt=1)
>>> imgs = np.stack(list(img.values()))
>>> resized_img = resize_img_stack(imgs=imgs)
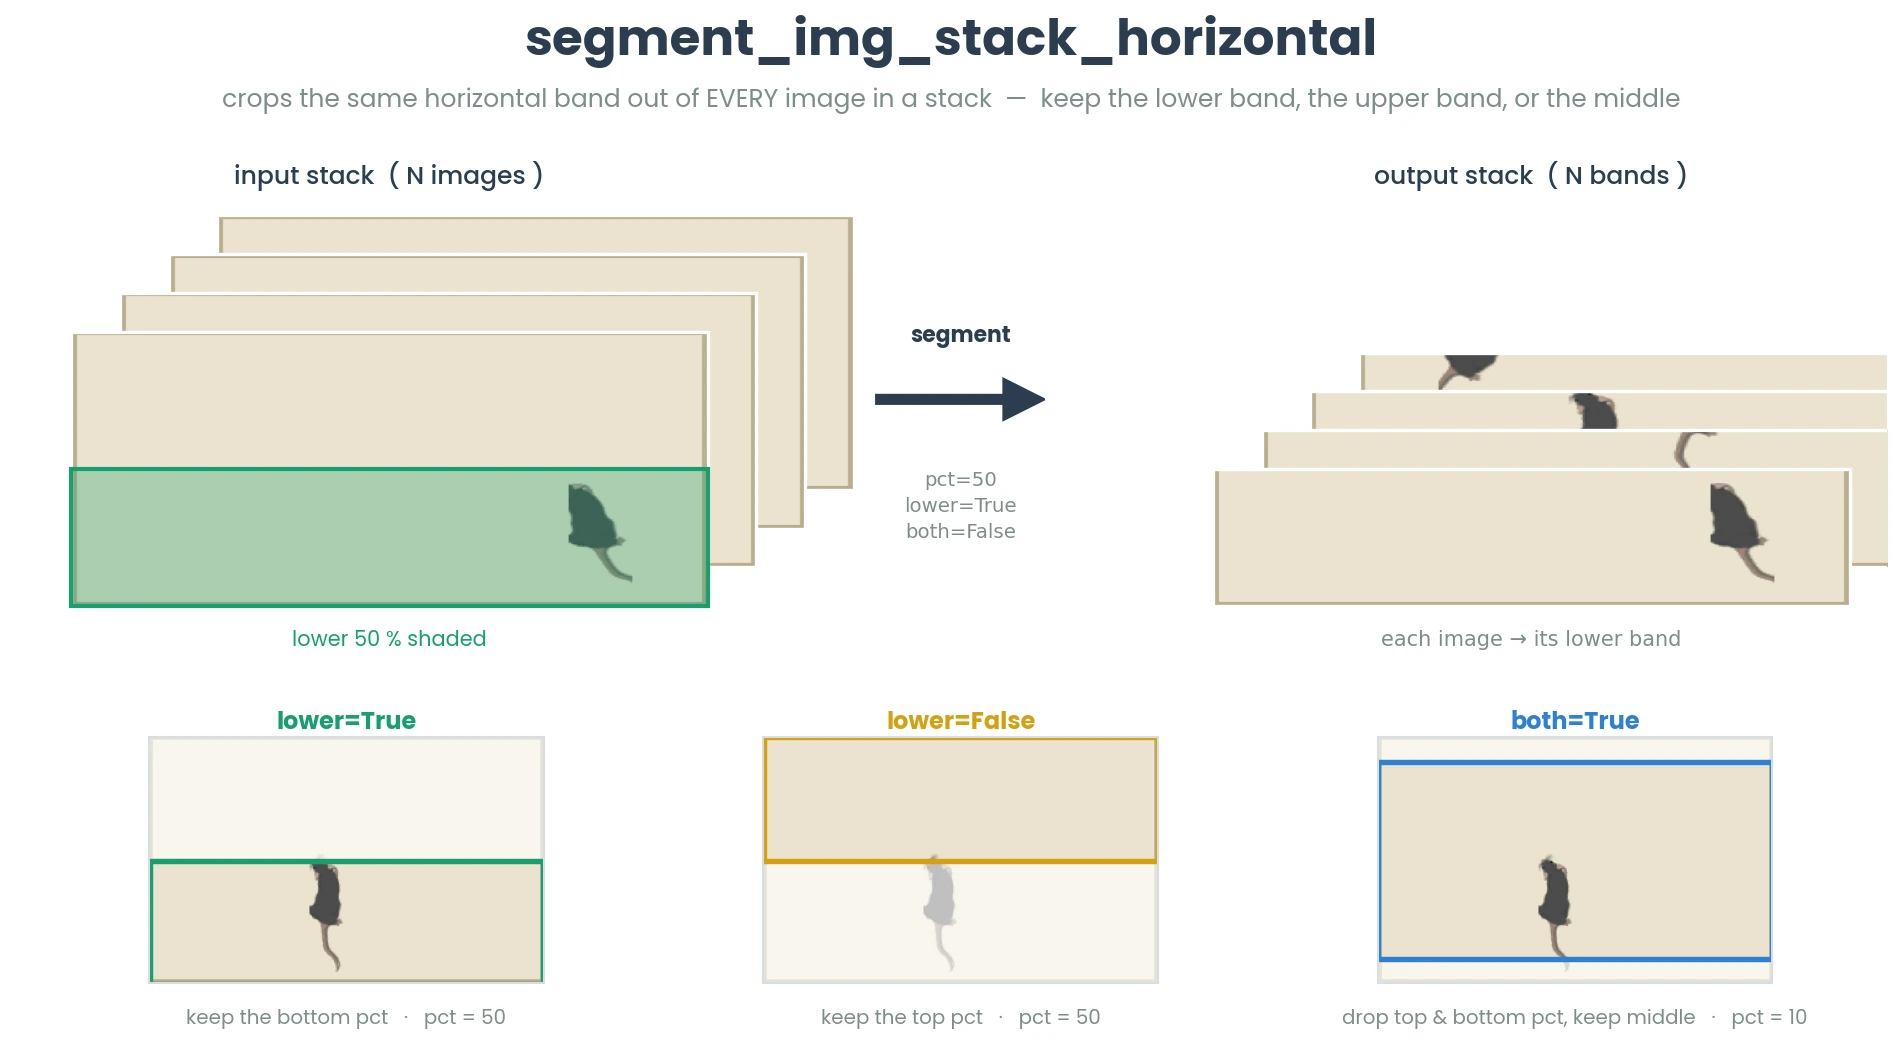
- static segment_img_horizontal(img, pct, lower=True, both=False)[source]
Segment a horizontal part of the input image.
This function segments either the lower, upper, or both lower and upper part of the input image based on the specified percentage.

See also
simba.mixins.image_mixin.ImageMixin.segment_img_stack_horizontal(),simba.mixins.image_mixin.ImageMixin.segment_img_vertical(),simba.data_processors.cuda.image.segment_img_stack_horizontal(),simba.data_processors.cuda.image.segment_img_stack_vertical()- Parameters
img (np.ndarray) – Input image as a NumPy array.
pct (int) – Percentage of the image to be segmented. If lower is True, it represents the lower part; if False, it represents the upper part.
lower (Optional[bool]) – Flag indicating whether to segment the lower part (True) or upper part (False) of the image. Default is True.
both (Optional[bool]) – If True, removes both the upper pct and lower pct and keeps middle part.
- Returns
Segmented part of the image.
- Return type
np.ndarray
- Example
>>> img = cv2.imread('/Users/simon/Desktop/test.png')
>>> img = ImageMixin.segment_img_horizontal(img=img, pct=10, both=True)
- static segment_img_stack_horizontal(imgs, pct, lower, both)[source]
Segment a horizontal part of all images in stack.
See also
simba.mixins.image_mixin.ImageMixin.segment_img_horizontal()simba.data_processors.cuda.image.segment_img_stack_horizontal(),- Example
>>> imgs = ImageMixin.read_img_batch_from_video(video_path='/Users/simon/Downloads/3A_Mouse_5-choice_MouseTouchBasic_a1.mp4', start_frm=0, end_frm=400)
>>> imgs = np.stack(imgs.values(), axis=0)
>>> sliced_imgs = ImageMixin.segment_img_stack_horizontal(imgs=imgs, pct=50, lower=True, both=False)
- static segment_img_vertical(img, pct, left=True, both=False)[source]
Segment a vertical part of the input image.
This function segments either the left, right or both the left and right part of input image based on the specified percentage.

See also
simba.data_processors.cuda.image.segment_img_stack_vertical()simba.data_processors.cuda.image.segment_img_stack_horizontal()- Parameters
img (np.ndarray) – Input image as a NumPy array.
pct (int) – Percentage of the image to be segmented. If lower is True, it represents the lower part; if False, it represents the upper part.
lower (Optional[bool]) – Flag indicating whether to segment the lower part (True) or upper part (False) of the image. Default is True.
both (Optional[bool]) – If True, removes both the left pct and right pct and keeps middle part.
- Returns
Segmented part of the image.
- Return type
np.ndarray
- static slice_shapes_in_img(img, geometries)[source]
Slice regions of interest (ROIs) from an image based on provided shapes.
Note
Use for slicing one or several static geometries from a single image. If you have several images, and shifting geometries across images, consider
simba.mixins.image_mixin.ImageMixin.slice_shapes_in_imgswhich uses CPU multiprocessing.See also
For GPU acceleration, see
simba.data_processors.cuda.image.slice_imgs()For single core method, seesimba.mixins.image_mixin.ImageMixin.slice_shapes_in_imgs()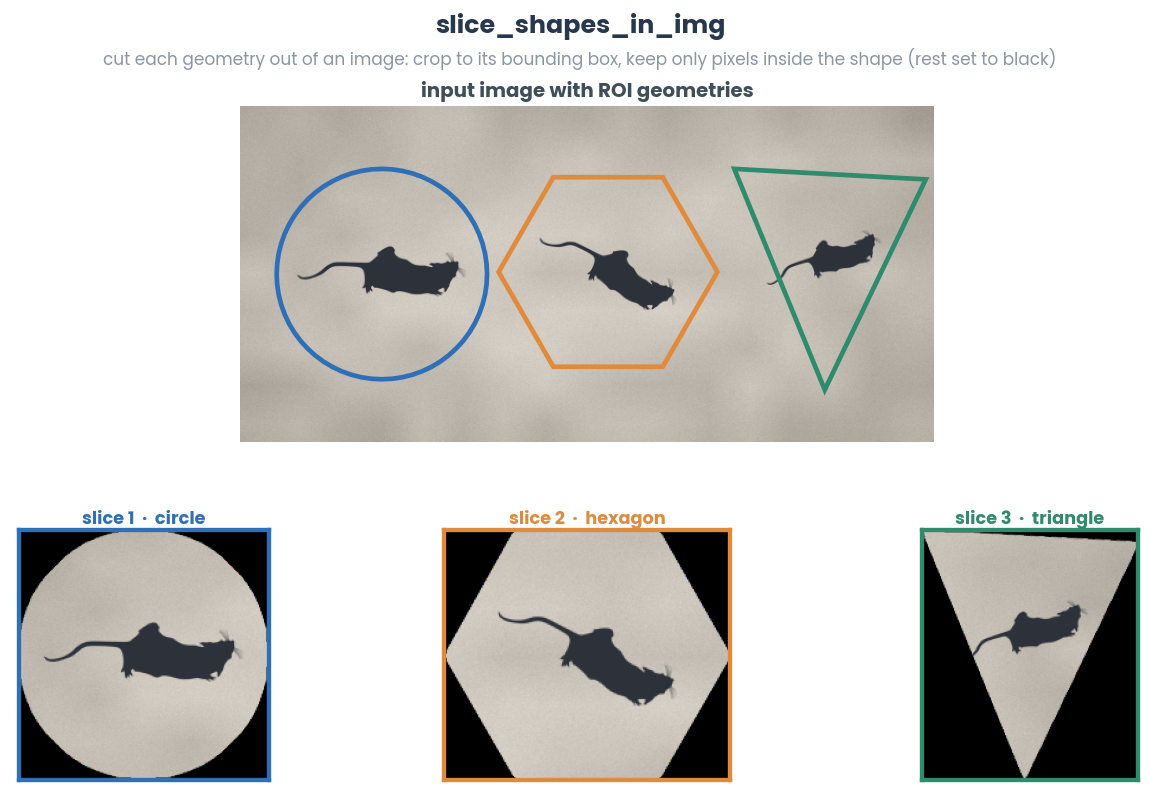
- Parameters
- Returns
List of sliced ROIs from the input image.
- Return type
List[np.ndarray]
>>> img = cv2.imread('/Users/simon/Desktop/envs/troubleshooting/Emergence/project_folder/videos/img_comparisons_4/1.png')
>>> img_video = cv2.VideoCapture('/Users/simon/Desktop/envs/troubleshooting/Emergence/project_folder/videos/Example_1.mp4')
>>> data_path = '/Users/simon/Desktop/envs/troubleshooting/Emergence/project_folder/csv/outlier_corrected_movement_location/Example_1.csv'
>>> data = pd.read_csv(data_path, nrows=4, usecols=['Nose_x', 'Nose_y']).fillna(-1).values.astype(np.int64)
>>> shapes = []
>>> for frm_data in data: shapes.append(GeometryMixin().bodyparts_to_circle(frm_data, 100))
>>> ImageMixin().slice_shapes_in_img(img=(img_video, 1), shapes=shapes)
- slice_shapes_in_imgs(imgs, shapes, core_cnt=- 1, verbose=False, bg_color=(255, 255, 255))[source]
Slice regions from a stack of images or a video file, where the regions are based on defined shapes. Uses multiprocessing.
For example, given a stack of N images, and N*X geometries representing the region around the animal body-part(s), slice out the X geometries from each of the N images and return the sliced areas.
See also
For GPU acceleration, see
simba.data_processors.cuda.image.slice_imgs()For single core process, usesimba.mixins.image_mixin.ImageMixin.slice_shapes_in_img()- Example I
>>> imgs = ImageMixin().read_img_batch_from_video(video_path='/Users/simon/Desktop/envs/troubleshooting/Emergence/project_folder/videos/Example_1.mp4', start_frm=0, end_frm=10)
>>> imgs = np.stack(list(imgs.values()))
>>> imgs_gray = ImageMixin().img_stack_to_greyscale(imgs=imgs)
>>> data = pd.read_csv('/Users/simon/Desktop/envs/troubleshooting/Emergence/project_folder/csv/outlier_corrected_movement_location/Example_1.csv', nrows=11).fillna(-1)
>>> nose_array, tail_array = data.loc[0:10, ['Nose_x', 'Nose_y']].values.astype(np.float32), data.loc[0:10, ['Tail_base_x', 'Tail_base_y']].values.astype(np.float32)
>>> nose_shapes, tail_shapes = [], []
>>> for frm_data in nose_array: nose_shapes.append(GeometryMixin().bodyparts_to_circle(frm_data, 80))
>>> for frm_data in tail_array: tail_shapes.append(GeometryMixin().bodyparts_to_circle(frm_data, 80))
>>> shapes = np.array(np.vstack([nose_shapes, tail_shapes]).T)
>>> sliced_images = ImageMixin().slice_shapes_in_imgs(imgs=imgs_gray, shapes=shapes)
- Example II
>>> video_path = '/Users/simon/Desktop/envs/troubleshooting/Emergence/project_folder/videos/Example_1_clipped.mp4'
>>> data_path = r'/Users/simon/Desktop/envs/troubleshooting/Emergence/project_folder/csv/outlier_corrected_movement_location/Example_1_clipped.csv'
>>> df = pd.read_csv(data_path, usecols=['Nose_x', 'Nose_y', 'Tail_base_x', 'Tail_base_y']).fillna(0).values.astype(int)
>>> data = df.reshape(len(df), -1, int(df.shape[1]/2))
>>> geometries = GeometryMixin().multiframe_bodyparts_to_line(data=data, buffer=30, px_per_mm=4.1)
>>> imgs = ImageMixin().slice_shapes_in_imgs(imgs=video_path, shapes=geometries)
- static sliding_cross_correlation_similarity(imgs, stride)[source]
Computes the Normalized Cross-Correlation (NCC) similarity for a sequence of images using a sliding window approach.
This function calculates the NCC between each image and the image that is stride positions before it in the sequence. The result is an array of NCC values representing the similarity between successive images.
See also
For simple two image NCC comparison, see
simba.mixins.image_mixin.ImageMixin.cross_correlation_similarity()For matrix based NCC comparisons, seesimba.mixins.image_mixin.ImageMixin.cross_correlation_matrix()- Parameters
imgs (np.ndarray) – A 3D array (for grayscale images) or a 4D array (for color images) containing the sequence of images. Each image should have the same size.
stride (int) – The stride length for comparing images. Determines how many steps back in the sequence each image is compared to.
- Returns
A 1D array of NCC values representing the similarity between each image and the image stride positions before it. The length of the array is the same as the number of images.
- Return type
np.ndarray
- Example
>>> imgs = ImageMixin.read_all_img_in_dir(dir='/Users/simon/Desktop/envs/simba/troubleshooting/RAT_NOR/project_folder/videos/08102021_DOT_Rat11_12_frames')
>>> imgs = {k: imgs[k] for k in sorted(imgs, key=lambda x: int(x.split('.')[0]))}
>>> imgs = np.stack(list(imgs.values()))
>>> results = ImageMixin.sliding_cross_correlation_similarity(imgs=imgs, stride=1)
- static sliding_structural_similarity_index(imgs, stride=1, verbose=False)[source]
Computes the Structural Similarity Index (SSI) between consecutive images in an array with a specified stride.
The function evaluates the SSI between pairs of images in the input array imgs using a sliding window approach with the specified stride. The SSI is computed for each pair of images and the results are stored in an output array. If the images are multi-channel (e.g., RGB), the SSI is computed for each channel.
High SSI values (close to 1) indicate high similarity between images, while low SSI values (close to 0 or negative) indicate low similarity.
See also
For matrix SSI of image stack, see
simba.mixins.image_mixin.ImageMixin.structural_similarity_matrix()For simple comparison of two images, seesimba.mixins.image_mixin.ImageMixin.structural_similarity_index()- Parameters
- Returns
A numpy array containing the SSI values for each pair of images.
- Return type
np.ndarray
- Example
>>> imgs = ImageMixin.read_all_img_in_dir(dir='/Users/simon/Desktop/envs/simba/troubleshooting/RAT_NOR/project_folder/videos/examples/test')
>>> imgs = {k: imgs[k] for k in sorted(imgs, key=lambda x: int(x.split('.')[0]))}
>>> imgs = list(imgs.values())
>>> results = ImageMixin.sliding_structural_similarity_index(imgs=imgs, stride=1, verbose=True)
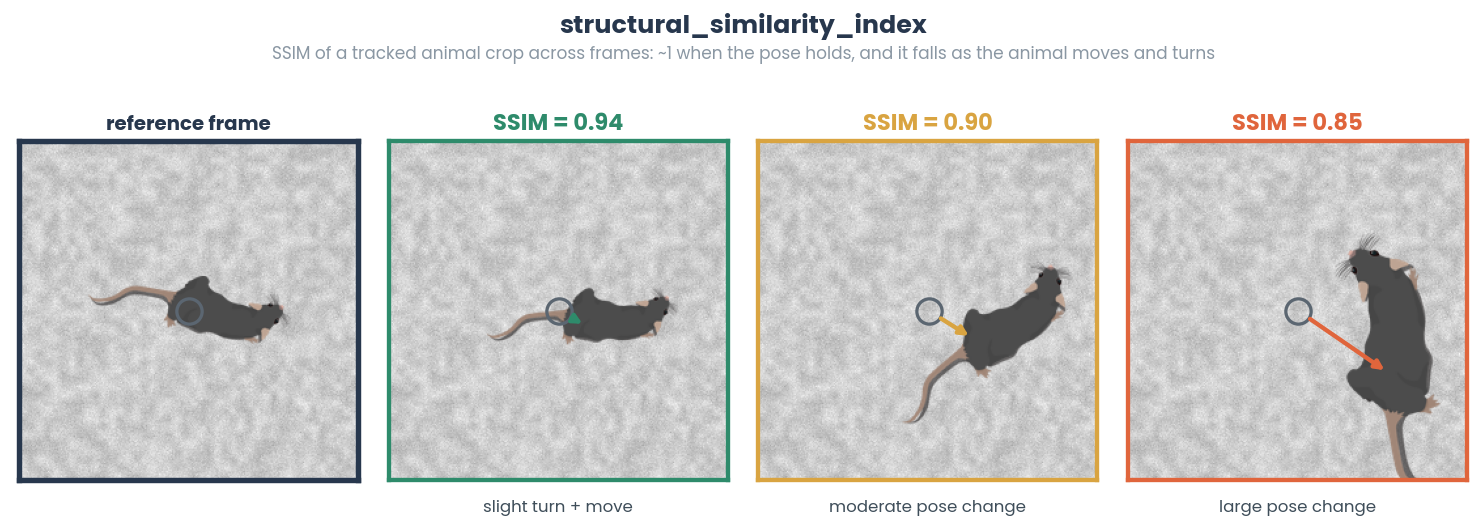
- static structural_similarity_index(img_1, img_2)[source]
Compute the Structural Similarity Index (SSI) between two images.
The function evaluates the SSI between two input images img_1 and img_2. If the images have different numbers of channels, they are converted to greyscale before computing the SSI. If the images are multi-channel (e.g., RGB), the SSI is computed for each channel.
See also
For matrix SSI of image stack, see
simba.mixins.image_mixin.ImageMixin.structural_similarity_matrix()for time-series based comparison, seesimba.mixins.image_mixin.ImageMixin.sliding_structural_similarity_index()- Parameters
img_1 (np.ndarray) – The first input image represented as a NumPy array.
img_2 (np.ndarray) – The second input image represented as a NumPy array.
- Returns
The SSI value representing the similarity between the two images.
- Return type
- static structural_similarity_matrix(imgs, verbose=False)[source]
Computes a matrix of Structural Similarity Index (SSI) values for a list of images.
This function takes a list of images and computes the SSI between each pair of images and produce a symmetric matrix.
See also
For time-series based comparison, see
simba.mixins.image_mixin.ImageMixin.sliding_structural_similarity_index()For simple comparison of two images, seesimba.mixins.image_mixin.ImageMixin.structural_similarity_index()- Parameters
imgs (List[np.array]) – A list of images represented as numpy arrays. If not all images are greyscale or color, they are converted and processed as greyscale.
verbose (Optional[bool]) – If True, prints progress messages showing which SSI values have been computed. Default is False.
- Returns
A square numpy array where the element at [i, j] represents the SSI between imgs[i] and imgs[j].
- Return type
np.ndarray
- Example
>>> imgs = ImageMixin.read_all_img_in_dir(dir='/Users/simon/Desktop/envs/simba/troubleshooting/RAT_NOR/project_folder/videos/examples/test')
>>> imgs = {k: imgs[k] for k in sorted(imgs, key=lambda x: int(x.split('.')[0]))}
>>> imgs = list(imgs.values())[0:10]
>>> results = ImageMixin.structural_similarity_matrix(imgs=imgs)
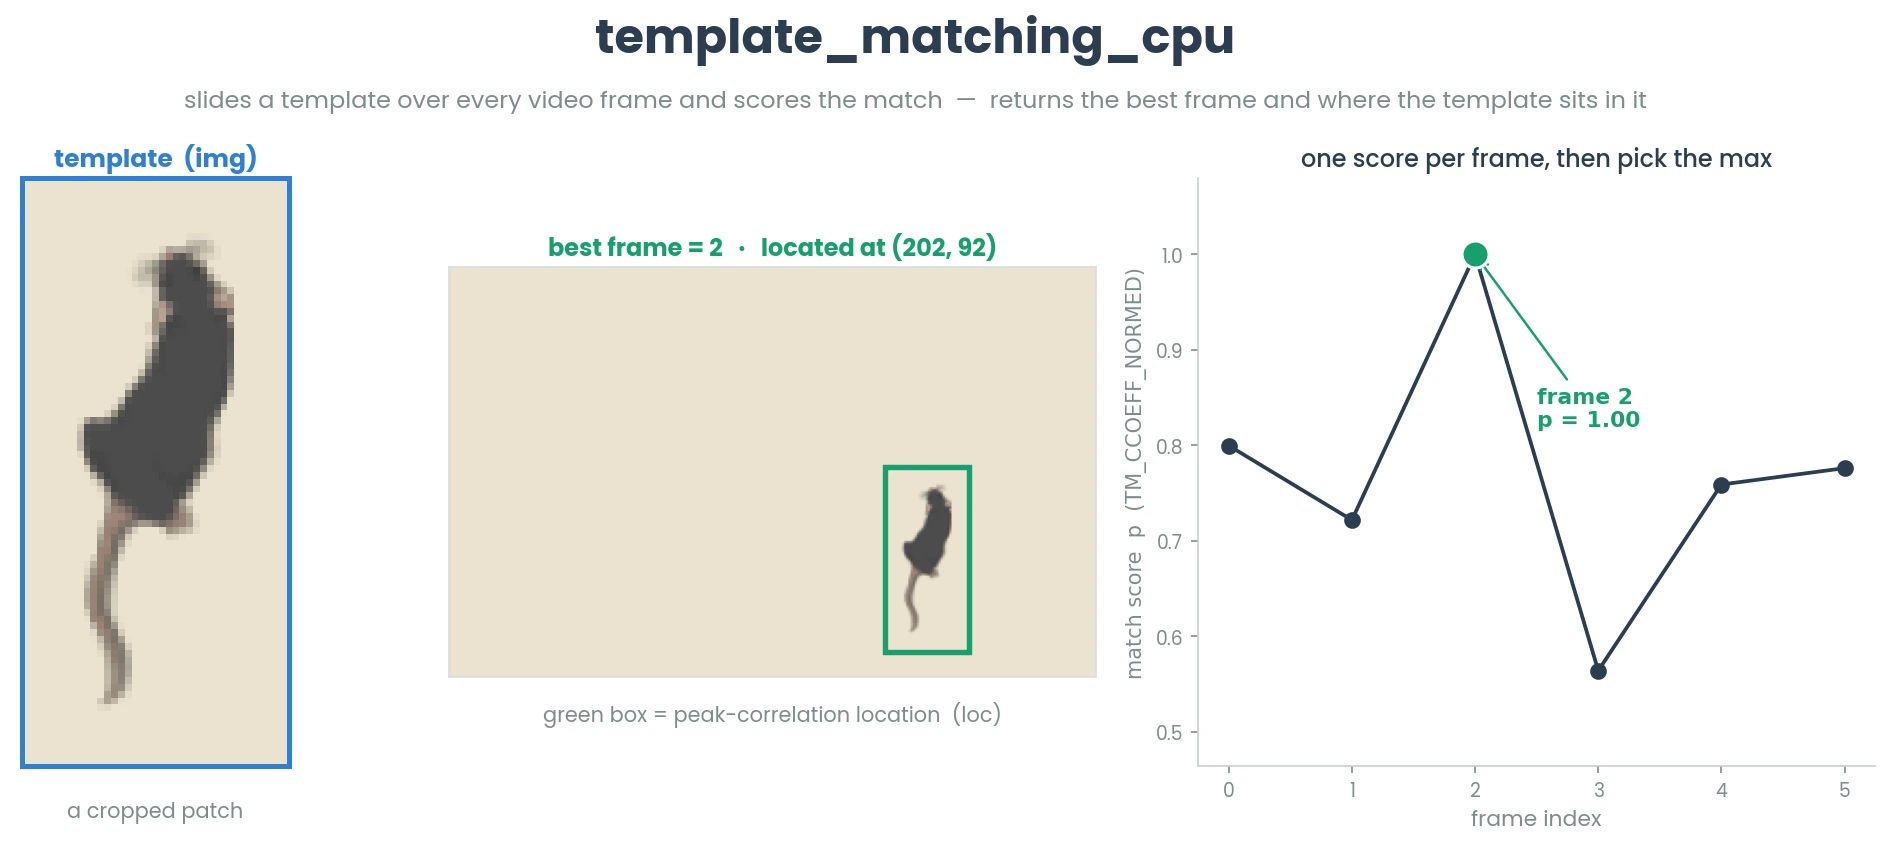
- static template_matching_cpu(video_path, img, core_cnt=- 1, return_img=False)[source]
Perform template matching on CPU using multiprocessing for parallelization.
E.g., having a cropped image, find the image and frame number in a video it most likely has been cropped from.
- Parameters
video_path (Union[str, os.PathLike]) – Path to the video file on disk.
img (np.ndarray) – Template image for matching. E.g., a cropped image from
video_path.core_cnt (Optional[int]) – Number of CPU cores to use for parallel processing. Default is -1 (max available cores).
return_img (Optional[bool]) – Whether to return the annotated best match image with rectangle around matched template area. Default is False.
- Returns
A tuple containing: (i) int: frame index of the frame with the best match. (ii) dict: Dictionary containing results (probability and match location) for each frame. (iii) Union[None, np.ndarray]: Annotated image with rectangles around matches (if return_img is True), otherwise None.
- Return type
- Example
>>> img = cv2.imread('/Users/simon/Desktop/envs/troubleshooting/two_black_animals_14bp/videos/Screenshot 2024-01-17 at 12.45.55 PM.png')
>>> results = ImageMixin().template_matching_cpu(video_path='/Users/simon/Desktop/envs/troubleshooting/two_black_animals_14bp/videos/Together_1.avi', img=img, return_img=True)
Image GPU methods
- simba.data_processors.cuda.image.bg_subtraction_cuda(video_path, avg_frm, save_path=None, bg_clr=(0, 0, 0), fg_clr=None, batch_size=500, threshold=50)[source]
Remove background from videos using GPU acceleration.
Note
To create an avg_frm, use
simba.video_processors.video_processing.create_average_frm(),simba.data_processors.cuda.image.create_average_frm_cupy(), orcreate_average_frm_cuda()See also
For CPU-based alternative, see
simba.video_processors.video_processing.video_bg_subtraction()orvideo_bg_subtraction_mp()For GPU-based alternative, seebg_subtraction_cupy(). Needs work, CPU/multicore appears faster.See also
To create average frame on the CPU, see
simba.video_processors.video_processing.create_average_frm(). CPU/multicore appears faster.EXPECTED RUNTIMES
FRAMES
GPU TIME (S)
GPU TIME (STEV)
450
2.76
0.18
900
5.45
0.208
1800
10.36
0.183
3600
20.527
0.886
7200
42.79
0.327
14400
82.95
3.69
28800
160.38
5.186
NVIDIA GeForce RTX 4070
video, RGB 620x530:
3 ITERATIONS
- Parameters
video_path (Union[str, os.PathLike]) – The path to the video to remove the background from.
avg_frm (np.ndarray) – Average frame of the video. Can be created with e.g.,
simba.video_processors.video_processing.create_average_frm().save_path (Optional[Union[str, os.PathLike]]) – Optional location to store the background removed video. If None, then saved in the same directory as the input video with the _bg_removed suffix.
bg_clr (Optional[Tuple[int, int, int]]) – Tuple representing the background color of the video.
fg_clr (Optional[Tuple[int, int, int]]) – Tuple representing the foreground color of the video (e.g., the animal). If None, then the original pixel colors will be used. Default: 50.
batch_size (Optional[int]) – Number of frames to process concurrently. Use higher values of RAM memory allows. Default: 500.
threshold (Optional[int]) – Value between 0-255 representing the difference threshold between the average frame subtracted from each frame. Higher values and more pixels will be considered background. Default: 50.
- Example
>>> video_path = "/mnt/c/troubleshooting/mitra/project_folder/videos/clipped/592_MA147_Gq_CNO_0515.mp4"
>>> avg_frm = create_average_frm(video_path=video_path)
>>> bg_subtraction_cuda(video_path=video_path, avg_frm=avg_frm, fg_clr=(255, 255, 255))
- simba.data_processors.cuda.image.bg_subtraction_cupy(video_path, avg_frm, save_path=None, bg_clr=(0, 0, 0), fg_clr=None, batch_size=500, threshold=50, verbose=True, async_frame_read=True)[source]
Remove background from videos using GPU acceleration through CuPY.
See also
For CPU-based alternative, see
simba.video_processors.video_processing.video_bg_subtraction()orvideo_bg_subtraction_mp()For GPU-based alternative, seebg_subtraction_cuda(). Needs work, CPU/multicore appears faster.- Parameters
video_path (Union[str, os.PathLike]) – The path to the video to remove the background from.
avg_frm (np.ndarray) – Average frame of the video. Can be created with e.g.,
simba.video_processors.video_processing.create_average_frm().save_path (Optional[Union[str, os.PathLike]]) – Optional location to store the background removed video. If None, then saved in the same directory as the input video with the _bg_removed suffix.
bg_clr (Optional[Tuple[int, int, int]]) – Tuple representing the background color of the video.
fg_clr (Optional[Tuple[int, int, int]]) – Tuple representing the foreground color of the video (e.g., the animal). If None, then the original pixel colors will be used. Default: 50.
batch_size (Optional[int]) – Number of frames to process concurrently. Use higher values of RAM memory allows. Default: 500.
threshold (Optional[int]) – Value between 0-255 representing the difference threshold between the average frame subtracted from each frame. Higher values and more pixels will be considered background. Default: 50.
- Example
>>> avg_frm = create_average_frm(video_path="/mnt/c/troubleshooting/mitra/project_folder/videos/temp/temp_ex_bg_subtraction/original/844_MA131_gq_CNO_0624.mp4")
>>> video_path = "/mnt/c/troubleshooting/mitra/project_folder/videos/temp/temp_ex_bg_subtraction/844_MA131_gq_CNO_0624_7.mp4"
>>> bg_subtraction_cupy(video_path=video_path, avg_frm=avg_frm, batch_size=500)
- simba.data_processors.cuda.image.create_average_frm_cuda(video_path, start_frm=None, end_frm=None, start_time=None, end_time=None, save_path=None, batch_size=6000, verbose=False, async_frame_read=False)[source]
Computes the average frame using GPU acceleration from a specified range of frames or time interval in a video file. This average frame typically used for background substraction.
The function reads frames from the video, calculates their average, and optionally saves the result to a specified file. If save_path is provided, the average frame is saved as an image file; otherwise, the average frame is returned as a NumPy array.
See also
For CuPy function see
create_average_frm_cupy(). For CPU function seecreate_average_frm().- Parameters
video_path (Union[str, os.PathLike]) – The path to the video file from which to extract frames.
start_frm (Optional[int]) – The starting frame number (inclusive). Either start_frm/end_frm or start_time/end_time must be provided, but not both.
end_frm (Optional[int]) – The ending frame number (exclusive).
start_time (Optional[str]) – The start time in the format ‘HH:MM:SS’ from which to begin extracting frames.
end_time (Optional[str]) – The end time in the format ‘HH:MM:SS’ up to which frames should be extracted.
save_path (Optional[Union[str, os.PathLike]]) – The path where the average frame image will be saved. If None, the average frame is returned as a NumPy array.
batch_size (Optional[int]) – The number of frames to process in each batch. Default is 3000. Increase if your RAM allows it.
verbose (Optional[bool]) – If True, prints progress and informational messages during execution.
- Returns
Returns None if the result is saved to save_path. Otherwise, returns the average frame as a NumPy array.
- Example
>>> create_average_frm_cuda(video_path=r"C:/troubleshooting/RAT_NOR/project_folder/videos/2022-06-20_NOB_DOT_4_downsampled.mp4", verbose=True, start_frm=0, end_frm=9000)
- simba.data_processors.cuda.image.create_average_frm_cupy(video_path, start_frm=None, end_frm=None, start_time=None, end_time=None, save_path=None, batch_size=3000, verbose=False, async_frame_read=False)[source]
Computes the average frame using GPU acceleration from a specified range of frames or time interval in a video file. This average frame is typically used for background subtraction.
The function reads frames from the video, calculates their average, and optionally saves the result to a specified file. If save_path is provided, the average frame is saved as an image file; otherwise, the average frame is returned as a NumPy array.
See also
For CPU function see
create_average_frm(). For CUDA function seecreate_average_frm_cuda()EXPECTED RUNTIMES
OBSERVATIONS (THOUSANDS)
TIME (S)
STDEV (S)
1
2.323333333
0.032145503
2
3.486666667
0.205993527
3
4.71
0.02
4
6.03
0.346987031
5
7.566666667
0.159478316
6
8.943333333
0.210792157
7
10.26666667
0.494098506
NVIDIA GeForce RTX 4070
REPEATS = 3
BATCH SIZE: 500.
RESOLUTION: 600 x 400
ASYNC FRAME READ: TRUE
- Parameters
video_path (Union[str, os.PathLike]) – The path to the video file from which to extract frames.
start_frm (Optional[int]) – The starting frame number (inclusive). Either start_frm/end_frm or start_time/end_time must be provided, but not both. If both start_frm and end_frm are None, processes all frames in the video.
end_frm (Optional[int]) – The ending frame number (exclusive). Either start_frm/end_frm or start_time/end_time must be provided, but not both.
start_time (Optional[str]) – The start time in the format ‘HH:MM:SS’ from which to begin extracting frames. Either start_frm/end_frm or start_time/end_time must be provided, but not both.
end_time (Optional[str]) – The end time in the format ‘HH:MM:SS’ up to which frames should be extracted. Either start_frm/end_frm or start_time/end_time must be provided, but not both.
save_path (Optional[Union[str, os.PathLike]]) – The path where the average frame image will be saved. If None, the average frame is returned as a NumPy array.
batch_size (Optional[int]) – The number of frames to process in each batch. Default is 3000. Increase if your RAM allows it.
verbose (Optional[bool]) – If True, prints progress and informational messages during execution. Default: False.
async_frame_read (bool) – If True, uses asynchronous frame reading for improved performance. Default: False.
- Returns
Returns None if the result is saved to save_path. Otherwise, returns the average frame as a NumPy array.
- Example
>>> create_average_frm_cupy(video_path=r"C:/troubleshooting/RAT_NOR/project_folder/videos/2022-06-20_NOB_DOT_4_downsampled.mp4", verbose=True, start_frm=0, end_frm=9000)
>>> create_average_frm_cupy(video_path=r"C:/videos/my_video.mp4", start_time="00:00:00", end_time="00:01:00", async_frame_read=True, save_path=r"C:/output/avg_frame.png")
- simba.data_processors.cuda.image.cross_correlation_matrix_cuda(imgs)[source]
Compute the normalized cross-correlation (NCC, in [-1, 1]) between every pair of images in a stack, on the GPU.
Note
Matches the CPU function to ~1e-6, and (unlike the CPU version, which is uint8-only) accepts any numeric dtype. Output is a dense (n_images, n_images) float32 matrix, so memory scales with n^2 (independent of image size); large image counts are bounded by GPU memory.
EXPECTED RUNTIMES
N IMAGES (128x128)
OUTPUT
MEAN (S)
SD (S)
PAIRS/S
100
40kb
0.0060
0.0001
1.7m
500
1mb
0.0500
0.0161
5.0m
1k
4mb
0.1143
0.0021
8.8m
2k
16mb
0.3673
0.0004
10.9m
5k
100mb
2.1043
0.0134
11.9m
10k
0.4gb
8.0947
0.0588
12.4m
20k
1.6gb
31.8439
0.2454
12.6m
NVIDIA GeForce RTX 4070 (12GB)
128x128 greyscale; mean +/- SD of 3 runs
compute-bound O(n^2 * pixels): time grows n^2 (memory allows ~50k but 20k already ~32s)
See also
CPU (numba) version:
simba.mixins.image_mixin.ImageMixin.cross_correlation_matrix().- Parameters
imgs (np.ndarray) – 3D array (n_images, H, W) - greyscale image stack.
- Returns
(n, n) float32 cross-correlation matrix; [i, j] is the NCC between image i and image j.
- Return type
np.ndarray
- Example
>>> m = cross_correlation_matrix_cuda(imgs) # imgs: (n, H, W) greyscale
- simba.data_processors.cuda.image.img_matrix_mse_cuda(imgs)[source]
Compute the pairwise mean-squared-error (MSE) between every pair of images in a stack, on the GPU.
Note
Matches the CPU function, including its cast to int32 (the MSE is truncated to a whole number). The op count is O(n^2 * pixels) so runtime grows with n^2 (compute-bound); the output is a dense (n_images, n_images) matrix so memory also scales with n^2.
EXPECTED RUNTIMES
N IMAGES (128x128)
OUTPUT
MEAN (S)
SD (S)
PAIRS/S
100
40kb
0.0052
0.0001
1.9m
500
1mb
0.0345
0.0018
7.3m
1k
4mb
0.1107
0.0022
9.0m
2k
16mb
0.3489
0.0030
11.5m
5k
100mb
2.0593
0.0073
12.1m
10k
0.4gb
8.0415
0.0936
12.4m
20k
1.6gb
31.6372
0.1203
12.6m
NVIDIA GeForce RTX 4070 (12GB)
128x128 greyscale; mean +/- SD of 3 runs; ~15x vs CPU jit
compute-bound O(n^2 * pixels): time grows n^2 (memory allows more but 20k already ~32s)
See also
CPU (numba) version:
simba.mixins.image_mixin.ImageMixin.img_matrix_mse().- Parameters
imgs (np.ndarray) – 3D array (n_images, H, W) - stack of same-shaped images.
- Returns
(n, n) int32 MSE matrix; [i, j] is the MSE between image i and image j.
- Return type
np.ndarray
- Example
>>> m = img_matrix_mse_cuda(imgs) # imgs: (n, H, W)
- simba.data_processors.cuda.image.img_stack_brightness(x, method='digital', ignore_black=True, verbose=False, batch_size=2500)[source]
Calculate the average brightness of a stack of images using a specified method.
Useful for analyzing light cues or brightness changes over time. For example, compute brightness in images containing a light cue ROI, then perform clustering (e.g., k-means) on brightness values to identify frames when the light cue is on vs off.
EXPECTED RUNTIMES
FRAME COUNT (K)
TIME (SECONDS)
STDEV (SECONDS)
1
0.76485
1.239735707
5
3.9256
10.04421855
7
9.445
11.46390422
RESOLUTON: 1200x600
3 RUNS
RTX 4090
Photometric Method: The brightness is calculated using the formula:
\[\text{brightness} = 0.2126 \cdot R + 0.7152 \cdot G + 0.0722 \cdot B\]Digital Method: The brightness is calculated using the formula:
\[\text{brightness} = 0.299 \cdot R + 0.587 \cdot G + 0.114 \cdot B\]See also
For CPU function see
brightness_intensity().- Parameters
x (np.ndarray) – A 4D array of images with dimensions (N, H, W, C), where N is the number of images, H and W are the height and width, and C is the number of channels (RGB).
method (Optional[Literal['photometric', 'digital']]) – The method to use for calculating brightness. It can be ‘photometric’ for the standard luminance calculation or ‘digital’ for an alternative set of coefficients. Default is ‘digital’.
ignore_black (Optional[bool]) – If True, black pixels (i.e., pixels with brightness value 0) will be ignored in the calculation of the average brightness. Default is True.
- Return np.ndarray
A 1D array of average brightness values for each image in the stack. If ignore_black is True, black pixels are ignored in the averaging process.
- Example
>>> imgs = read_img_batch_from_video_gpu(video_path=r"/mnt/c/troubleshooting/RAT_NOR/project_folder/videos/2022-06-20_NOB_DOT_4_downsampled.mp4", start_frm=0, end_frm=5000)
>>> imgs = np.stack(list(imgs.values()), axis=0)
>>> x = img_stack_brightness(x=imgs)
- simba.data_processors.cuda.image.img_stack_to_bw(imgs, lower_thresh=100, upper_thresh=100, invert=True, batch_size=1000)[source]
Converts a stack of RGB images to binary (black and white) images based on given threshold values using GPU acceleration.
This function processes a 4D stack of images, converting each RGB image to a binary image using specified lower and upper threshold values. The conversion can be inverted if desired, and the processing is done in batches for efficiency.
EXPECTED RUNTIMES
FRAMES (K)
TIME (S)
1
0.280
2
0.260
4
0.600
8
1.100
See also
simba.mixins.image_mixin.ImageMixin.img_to_bw()simba.mixins.image_mixin.ImageMixin.img_stack_to_bw()- Parameters
imgs (np.ndarray) – A 4D NumPy array representing a stack of RGB images, with shape (N, H, W, C).
lower_thresh (Optional[int]) – The lower threshold value. Pixel values below this threshold are set to 0 (or 1 if invert is True). Default is 100.
upper_thresh (Optional[int]) – The upper threshold value. Pixel values above this threshold are set to 1 (or 0 if invert is True). Default is 100.
invert (Optional[bool]) – If True, the binary conversion is inverted, meaning that values below lower_thresh become 1, and values above upper_thresh become 0. Default is True.
batch_size (Optional[int]) – The number of images to process in a single batch. This helps manage memory usage for large stacks of images. Default is 1000.
- Returns
A 3D NumPy array of shape (N, H, W), where each image has been converted to a binary format with pixel values of either 0 or 1.
- Return type
np.ndarray
- simba.data_processors.cuda.image.img_stack_to_grayscale_cuda(x)[source]
Convert image stack to grayscale using CUDA.
See also
For CPU function single images
img_to_greyscale()andimg_stack_to_greyscale()for stack. For CuPy, seeimg_stack_to_grayscale_cupy().EXPECTED RUNTIMES
FRAMES (k)
GPU (s)
STDEV (s)
1
0.16022
0.125786
2
0.14428
0.003726
3
0.19769
0.005645
4
0.2571
0.006002
5
0.33574
0.017868
6
0.39921
0.026858
7
0.45734
0.0333
8
0.53216
0.015075
9
0.50257
0.023186
10
0.54235
0.090055
11
0.69896
0.00999
12
0.57932
0.0010399
13
0.63791
0.017
14
0.99677
0.1073426
15
1.56103
0.5308574
16
1.08143
0.082
17
1.39189
0.3308389
18
1.23648
0.1386822
19
1.39554
0.161
20
1.962
0.576
NVIDIA GeForce RTX 4070
REPEATS= 3
- Parameters
x (np.ndarray) – 4d array of color images in numpy format.
- Return np.ndarray
3D array of greyscaled images.
- Example
>>> imgs = read_img_batch_from_video_gpu(video_path=r"/mnt/c/troubleshooting/mitra/project_folder/videos/temp_2/592_MA147_Gq_Saline_0516_downsampled.mp4", verbose=False, start_frm=0, end_frm=i)
>>> imgs = np.stack(list(imgs.values()), axis=0).astype(np.uint8)
>>> grey_images = img_stack_to_grayscale_cuda(x=imgs)
- simba.data_processors.cuda.image.img_stack_to_grayscale_cupy(imgs, batch_size=250)[source]
Converts a stack of color images to grayscale using GPU acceleration with CuPy.
See also
For CPU function single images
img_to_greyscale()andimg_stack_to_greyscale()for stack. For CUDA JIT, seeimg_stack_to_grayscale_cuda().EXPECTED RUNTIMES
FRAMES (THOUSANDS)
GPU (s)
0.5
0.3419
1
0.52333
1.5
0.81614
2
1.0632
2.5
1.32399
3
1.61488
3.5
1.87857
4
2.30137
4.5
2.54736
5
2.90824
5.5
3.09271
- Parameters
imgs (np.ndarray) – A 4D NumPy or CuPy array representing a stack of images with shape (num_images, height, width, channels). The images are expected to have 3 channels (RGB).
batch_size (Optional[int]) – The number of images to process in each batch. Defaults to 250. Adjust this parameter to fit your GPU’s memory capacity.
- Return np.ndarray
m A 3D NumPy or CuPy array of shape (num_images, height, width) containing the grayscale images. If the input array is not 4D, the function returns the input as is.
- Example
>>> imgs = read_img_batch_from_video_gpu(video_path=r"/mnt/c/troubleshooting/RAT_NOR/project_folder/videos/2022-06-20_NOB_IOT_1_cropped.mp4", verbose=False, start_frm=0, end_frm=i)
>>> imgs = np.stack(list(imgs.values()), axis=0).astype(np.uint8)
>>> gray_imgs = img_stack_to_grayscale_cupy(imgs=imgs)
- simba.data_processors.cuda.image.pose_plotter(data, video_path, save_path, circle_size=None, colors='Set1', batch_size=750, verbose=True)[source]
Creates a video overlaying pose-estimation data on frames from a given video using GPU acceleration.
See also
For a faster, fully on-GPU version (NVDEC decode + NVENC encode), see
simba.data_processors.cuda.pose_plotter_nvenc.PosePlotterNVENC. For CPU based methods, seePathPlotterSingleCore()andPathPlotterMulticore().EXPECTED RUNTIMES
FRAMES (K)
TIME (S)
4
17
6
27
10
36
18
63
26
93
NVIDIA GeForce RTX 4070
7 body-parts
FRAME SIZE (WxH): 726x538
BATCH SIZE: 1000 images
- Parameters
data (Union[str, os.PathLike, np.ndarray]) – Path to a CSV file with pose-estimation data or a 3d numpy array (n_images, n_bodyparts, 2) with pose-estimated locations.
video_path (Union[str, os.PathLike]) – Path to a video file where the
datahas been pose-estimated.save_path (Union[str, os.PathLike]) – Location where to store the output visualization.
circle_size (Optional[int]) – The size of the circles representing the location of the pose-estimated locations. If None, the optimal size will be inferred as a 100th of the max(resultion_w, h).
batch_size (int) – The number of frames to process concurrently on the GPU. Default: 750. Increase of host and device RAM allows it to improve runtime. Decrease if you hit memory errors.
- Example
>>> DATA_PATH = "/mnt/c/troubleshooting/mitra/project_folder/csv/outlier_corrected_movement_location/501_MA142_Gi_CNO_0521.csv"
>>> VIDEO_PATH = "/mnt/c/troubleshooting/mitra/project_folder/videos/501_MA142_Gi_CNO_0521.mp4"
>>> SAVE_PATH = "/mnt/c/troubleshooting/mitra/project_folder/frames/output/pose_ex/test.mp4"
>>> pose_plotter(data=DATA_PATH, video_path=VIDEO_PATH, save_path=SAVE_PATH, circle_size=10, batch_size=1000)
- simba.data_processors.cuda.image.rotate_img_stack_cupy(imgs, rotation_degrees=180, batch_size=500, verbose=True)[source]
Rotates a stack of images by a specified number of degrees using GPU acceleration with CuPy.
Accepts a 3D (single-channel images) or 4D (multichannel images) NumPy array, rotates each image in the stack by the specified degree around the center, and returns the result as a NumPy array.
- Parameters
imgs (np.ndarray) – The input stack of images to be rotated. Expected to be a NumPy array with 3 or 4 dimensions. 3D shape: (num_images, height, width) - 4D shape: (num_images, height, width, channels)
rotation_degrees (Optional[float]) – The angle by which the images should be rotated, in degrees. Must be between 1 and 359 degrees. Defaults to 180 degrees.
batch_size (Optional[int]) – Number of images to process on GPU in each batch. Decrease if data can’t fit on GPU RAM.
- Returns
A NumPy array containing the rotated images with the same shape as the input.
- Return type
np.ndarray
- Example
>>> video_path = r"/mnt/c/troubleshooting/mitra/project_folder/videos/F0_gq_Saline_0626_clipped.mp4"
>>> imgs = read_img_batch_from_video_gpu(video_path=video_path)
>>> imgs = np.stack(np.array(list(imgs.values())), axis=0)
>>> imgs = rotate_img_stack_cupy(imgs=imgs, rotation=50)
- simba.data_processors.cuda.image.rotate_video_cupy(video_path, save_path=None, rotation_degrees=180, batch_size=None, verbose=True)[source]
Rotates a video by a specified angle using GPU acceleration and CuPy for image processing.
- Parameters
video_path (Union[str, os.PathLike]) – Path to the input video file.
save_path (Optional[Union[str, os.PathLike]]) – Path to save the rotated video. If None, saves the video in the same directory as the input with ‘_rotated_<rotation_degrees>’ appended to the filename.
rotation_degrees (nptional[float]) – Degrees to rotate the video. Must be between 1 and 359 degrees. Default is 180.
batch_size (Optional[int]) – The number of frames to process in each batch. Deafults to None meaning all images will be processed in a single batch.
- Returns
None.
- Example
>>> video_path = r"/mnt/c/troubleshooting/mitra/project_folder/videos/F0_gq_Saline_0626_clipped.mp4"
>>> rotate_video_cupy(video_path=video_path, rotation_degrees=45)
- simba.data_processors.cuda.image.segment_img_stack_horizontal(imgs, pct, upper=False, lower=False)[source]
Segment a stack of images horizontally based on a given percentage using GPU acceleration. For example, return the top half, bottom half, or center half of each image in the stack.
Note
If both top and bottom are true, the center portion is returned.
- Parameters
imgs (np.ndarray) – A 3D or 4D NumPy array representing a stack of images. The array should have shape (N, H, W) for grayscale images or (N, H, W, C) for color images.
pct (float) – The percentage of the image width to be used for segmentation. This value should be between a small positive value (e.g., 10e-6) and 0.99.
upper (bool) – If True, the top part of the image stack will be segmented.
lower (bool) – If True, the bottom part of the image stack will be segmented.
- Returns
A NumPy array containing the segmented images, with the same number of dimensions as the input.
- Return type
np.ndarray
- simba.data_processors.cuda.image.segment_img_stack_vertical(imgs, pct, left, right)[source]
Segment a stack of images vertically based on a given percentage using GPU acceleration. For example, return the left half, right half, or senter half of each image in the stack.
Note
If both left and right are true, the center portion is returned.
- Parameters
imgs (np.ndarray) – A 3D or 4D NumPy array representing a stack of images. The array should have shape (N, H, W) for grayscale images or (N, H, W, C) for color images.
pct (float) – The percentage of the image width to be used for segmentation. This value should be between a small positive value (e.g., 10e-6) and 0.99.
left (bool) – If True, the left side of the image stack will be segmented.
right (bool) – If True, the right side of the image stack will be segmented.
- Returns
A NumPy array containing the segmented images, with the same number of dimensions as the input.
- Return type
np.ndarray
- simba.data_processors.cuda.image.slice_imgs(video_path, shapes, batch_size=1000, verbose=True, save_dir=None)[source]
Slice frames from a video based on given polygon or circle coordinates, and return or save masked/cropped frame regions using GPU acceleration.
This function supports two types of shapes:
Polygon: array of shape (N, M, 2), where N = number of frames, M = number of polygon vertices.
Circle: array of shape (N, 3), where each row represents [center_x, center_y, radius].
- Parameters
video_path (Union[str, os.PathLike]) – Path to the input video file.
shapes (np.ndarray) – Array of polygon coordinates or circle parameters for each frame. - Polygon: shape = (n_frames, n_vertices, 2) - Circle: shape = (n_frames, 3)
batch_size (int) – Number of frames to process per batch during GPU processing. Default 1000.
verbose (bool) – Whether to print progress and status messages. Default True.
save_dir (Optional[Union[str, os.PathLike]]) – If provided, the masked/cropped video will be saved in this directory. Otherwise, the cropped image stack will be returned.
EXPECTED RUNTIMES
FRAMES N
TIME (S)
500
2.92
1000
2.134
2000
3.881
4000
7.358
8000
15.066
16000
35.156
32000
57.9812
IMG SIZE: 714 x 528
Note
For CPU multicore implementation, see
simba.mixins.image_mixin.ImageMixin.slice_shapes_in_imgs(). For single core process, seesimba.mixins.image_mixin.ImageMixin.slice_shapes_in_img()- Example I
Example 1: Mask video using circular regions derived from body part center positions >>> video_path = “/mnt/c/troubleshooting/RAT_NOR/project_folder/videos/03152021_NOB_IOT_8.mp4” >>> data_path = “/mnt/c/troubleshooting/RAT_NOR/project_folder/csv/outlier_corrected_movement_location/03152021_NOB_IOT_8.csv” >>> save_dir = ‘/mnt/d/netholabs/yolo_videos/input/mp4_20250606083508’ >>> nose_arr = read_df(file_path=data_path, file_type=’csv’, usecols=[‘Nose_x’, ‘Nose_y’]).values.reshape(-1, 2).astype(np.int32) >>> polygons = GeometryMixin().multiframe_bodyparts_to_circle(data=nose_arr, parallel_offset=60) >>> polygon_lst = [] >>> center = GeometryMixin.get_center(polygons) >>> polygons = np.hstack([center, np.full(shape=(len(center), 1), fill_value=60)]) >>> slice_imgs(video_path=video_path, shapes=polygons, batch_size=500, save_dir=save_dir)
- Example II
Example 2: Mask video using minimum rotated rectangles from polygon hulls
>>> video_path = "/mnt/c/troubleshooting/RAT_NOR/project_folder/videos/03152021_NOB_IOT_8.mp4"
>>> data_path = "/mnt/c/troubleshooting/RAT_NOR/project_folder/csv/outlier_corrected_movement_location/03152021_NOB_IOT_8.csv"
>>> save_dir = '/mnt/d/netholabs/yolo_videos/input/mp4_20250606083508'
>>> nose_arr = read_df(file_path=data_path, file_type='csv', usecols=['Nose_x', 'Nose_y', 'Tail_base_x', 'Tail_base_y', 'Lat_left_x', 'Lat_left_y', 'Lat_right_x', 'Lat_right_y']).values.reshape(-1, 4, 2).astype(np.int32) ## READ THE BODY-PART THAT DEFINES THE HULL AND CONVERT TO ARRAY
>>> polygons = GeometryMixin().multiframe_bodyparts_to_polygon(data=nose_arr, parallel_offset=60)
>>> polygons = GeometryMixin().multiframe_minimum_rotated_rectangle(shapes=polygons)
>>> polygon_lst = []
>>> for i in polygons:
>>> polygon_lst.append(np.array(i.exterior.coords).astype(np.int32))
>>> polygons = np.stack(polygon_lst, axis=0)
>>> sliced_imgs = slice_imgs(video_path=video_path, shapes=polygons, batch_size=500, save_dir=save_dir)
- simba.data_processors.cuda.image.sliding_psnr(data, stride_s, sample_rate)[source]
Computes the Peak Signal-to-Noise Ratio (PSNR) between pairs of images in a stack using a sliding window approach.
This function calculates PSNR for each image in a stack compared to another image in the stack that is separated by a specified stride. The sliding window approach allows for the comparison of image quality over a sequence of images.
Note
PSNR values are measured in decibels (dB).
Higher PSNR values indicate better quality with minimal differences from the reference image.
Lower PSNR values indicate higher distortion or noise.
\[\text{PSNR} = 20 \log_{10} \left( \frac{\text{MAX}}{\sqrt{\text{MSE}}} \right)\]where: - \(\text{MAX}\) is the maximum possible pixel value (255 for 8-bit images) - \(\text{MSE}\) is the Mean Squared Error between the two images
- Parameters
data – A 4D NumPy array of shape (N, H, W, C) representing a stack of images, where N is the number of images, H is the height, W is the width, and C is the number of color channels.
stride_s – The base stride length in terms of the number of images between the images being compared. Determines the separation between images for comparison in the stack.
sample_rate – The sample rate to scale the stride length. This allows for adjusting the stride dynamically based on the sample rate.
- Returns
A 1D NumPy array of PSNR values, where each element represents the PSNR between the image at index r and the image at index l = r - stride, for all valid indices r.
- Return type
np.ndarray
- Example
>>> data = ImageMixin().read_img_batch_from_video(video_path =r"/mnt/c/troubleshooting/mitra/project_folder/videos/clipped/501_MA142_Gi_CNO_0514_clipped.mp4", start_frm=0, end_frm=299)
>>> data = np.stack(list(data.values()), axis=0).astype(np.uint8)
>>> data = ImageMixin.img_stack_to_greyscale(imgs=data)
>>> p = sliding_psnr(data=data, stride_s=1, sample_rate=1)
- simba.data_processors.cuda.image.stack_sliding_mse(x, stride=1, batch_size=1000)[source]
Computes the Mean Squared Error (MSE) between each image in a stack and a reference image, where the reference image is determined by a sliding window approach with a specified stride. The function is optimized for large image stacks by processing them in batches.
See also
For CPU function see
img_stack_mse()andimg_sliding_mse().\[\text{MSE} = \frac{1}{n} \sum_{i=1}^{n} (y_i - \hat{y}_i)^2\]- Parameters
x (np.ndarray) – Input array of images, where the first dimension corresponds to the stack of images. The array should be either 3D (height, width, channels) or 4D (batch, height, width, channels).
stride (Optional[int]) – The stride or step size for the sliding window that determines the reference image. Defaults to 1, meaning the previous image in the stack is used as the reference.
batch_size (Optional[int]) – The number of images to process in a single batch. Larger batch sizes may improve performance but require more GPU memory. Defaults to 1000.
- Returns
A 1D NumPy array containing the MSE for each image in the stack compared to its corresponding reference image. The length of the array is equal to the number of images in the input stack.
- Return type
np.ndarray
- simba.data_processors.cuda.image.structural_similarity_matrix_cuda(imgs, data_range=255.0)[source]
Compute the windowed structural-similarity index (SSIM) between every pair of images in a stack, on the GPU.
Note
Matches skimage’s mean-SSIM exactly (7x7 window). Compute-bound - the op count is O(n^2 * pixels * 49) so runtime grows with n^2 and image size; the output is a dense (n_images, n_images) matrix so memory also scales with n^2.
EXPECTED RUNTIMES
N IMAGES (128x128)
OUTPUT
MEAN (S)
SD (S)
PAIRS/S
50
10kb
0.4511
0.010
5.5k
100
40kb
0.5689
0.012
17.6k
300
0.4mb
2.1454
0.030
42.0k
600
1.4mb
7.4050
0.090
48.6k
1k
4mb
24.496
3.429
40.8k
NVIDIA GeForce RTX 4070 (12GB)
128x128 greyscale; mean +/- SD of 3 runs; exact match to skimage
~6-13x vs CPU skimage (grows with n); compute-bound O(n^2 * pixels * 49)
See also
CPU (skimage) version:
simba.mixins.image_mixin.ImageMixin.structural_similarity_matrix().- Parameters
imgs (np.ndarray) – 3D array (n_images, H, W) - greyscale image stack (H, W >= 7).
data_range (float) – Value range of the images (255 for uint8; pass 1.0 for float images in [0, 1]). Sets C1=(0.01*range)^2, C2=(0.03*range)^2. Default 255.
- Returns
(n, n) float32 SSIM matrix; [i, j] is the mean SSIM between image i and image j.
- Return type
np.ndarray
- Example
>>> m = structural_similarity_matrix_cuda(imgs) # imgs: (n, H, W) greyscale uint8
Egocentric alignment
Rotate and translate frames (and their pose data) into an egocentric reference frame, so a chosen body-part anchor is centred and a body axis points in a fixed direction across the whole video.
- class simba.data_processors.egocentric_aligner.EgocentricalAligner(data_dir, save_dir, anchor_1='tail_base', anchor_2='nose', direction=0, core_cnt=- 1, fill_clr=(250, 250, 255), verbose=True, gpu=False, videos_dir=None, anchor_location=(250, 250))[source]
Aligns and rotates movement data and associated video frames based on specified anchor points to produce an egocentric view of the subject. The class aligns frames around a selected anchor point, optionally rotating the subject to a consistent direction and saving the output video.
See also
To produce rotation vectors, uses
egocentrically_align_pose_numba()oregocentrically_align_pose(). To rotate video only, seeEgocentricVideoRotator()- Parameters
config_path (Union[str, os.PathLike]) – Path to the configuration file.
save_dir (Union[str, os.PathLike]) – Directory where the processed output will be saved.
data_dir (Optional[Union[str, os.PathLike]]) – Directory containing CSV files with movement data.
anchor_1 (Optional[str]) – Primary anchor point (e.g., ‘tail_base’) around which the alignment centers.
anchor_2 (Optional[str]) – Secondary anchor point (e.g., ‘nose’) defining the alignment direction.
direction (int) – Target angle, in degrees, for alignment; e.g., 0 aligns east
anchor_location (Optional[Tuple[int, int]]) – Pixel location in the output where anchor_1 should appear; default is (250, 250).
fill_clr (Tuple[int, int, int]) – If rotating the videos, the color of the additional pixels.
rotate_video (Optional[bool]) – Whether to rotate the video to align with the specified direction.
core_cnt (Optional[int]) – Number of CPU cores to use for video rotation; -1 uses all available cores.
- Example
>>> aligner = EgocentricalAligner(rotate_video=True, anchor_1='tail_base', anchor_2='nose', data_dir=r"/data_dir", videos_dir=r'/videos_dir', save_dir=r"/save_dir", video_info=r"C:/troubleshooting/mitra/project_folder/logs/video_info.csv", direction=0, anchor_location=(250, 250), fill_clr=(0, 0, 0))
>>> aligner.run()
- run()[source]
- class simba.video_processors.egocentric_video_rotator.EgocentricVideoRotator(video_path, centers, rotation_vectors, anchor_location, verbose=True, fill_clr=(0, 0, 0), core_cnt=- 1, save_path=None, gpu=True, pool=None)[source]
Perform egocentric rotation of a video using CPU multiprocessing.
See also
For a GPU (NVDEC -> CUDA -> NVENC) version, see
EgocentricRotatorNVENC. To perform joint egocentric alignment of both pose and video, or pose only, useEgocentricalAligner(). To produce rotation vectors, useegocentrically_align_pose_numba()oregocentrically_align_pose().- Parameters
video_path (Union[str, os.PathLike]) – Path to a video file.
centers (np.ndarray) – A 2D array of shape (num_frames, 2) containing the original locations of anchor_1_idx in each frame before alignment. Returned by
egocentrically_align_pose_numba()oregocentrically_align_pose().rotation_vectors (np.ndarray) – A 3D array of shape (num_frames, 2, 2) containing the rotation matrices applied to each frame. Returned by
egocentrically_align_pose_numba()oregocentrically_align_pose().verbose (bool) – If True, prints progress. Deafult True.
fill_clr (Tuple[int, int, int]) – The color of the additional pixels. Deafult black. (0, 0, 0).
core_cnt (int) – Number of CPU cores to use for video rotation; -1 uses all available cores.
save_path (Optional[Union[str, os.PathLike]]) – The location where to store the rotated video. If None, saves the video as the same dir as the input video with the _rotated suffix.
- Example
>>> DATA_PATH = "C:/501_MA142_Gi_Saline_0513.csv"
>>> VIDEO_PATH = "C:/501_MA142_Gi_Saline_0513.mp4"
>>> SAVE_PATH = "C:/501_MA142_Gi_Saline_0513_rotated.mp4"
>>> ANCHOR_LOC = np.array([250, 250])
>>> df = read_df(file_path=DATA_PATH, file_type='csv')
>>> bp_cols = [x for x in df.columns if not x.endswith('_p')]
>>> data = df[bp_cols].values.reshape(len(df), int(len(bp_cols)/2), 2).astype(np.int32)
>>> _, centers, rotation_vectors = egocentrically_align_pose(data=data, anchor_1_idx=6, anchor_2_idx=2, anchor_location=ANCHOR_LOC, direction=0)
>>> rotater = EgocentricVideoRotator(video_path=VIDEO_PATH, centers=centers, rotation_vectors=rotation_vectors, anchor_location=ANCHOR_LOC, save_path=SAVE_PATH)
>>> rotater.run()
- run()[source]
CLAHE contrast enhancement (GPU)
- class simba.data_processors.cuda.clahe_nvenc.ClaheNVENC(data_path, save_dir, clip_limit=2, tile_grid_size=(16, 16), codec='h264', buffer_size=16, n_workers=None, verbose=True)[source]
Colour-preserving CLAHE, fully on the GPU (NVDEC -> CUDA -> NVENC). GPU-only.
CLAHE is applied to the Y (luma) channel in YCrCb space; Cr/Cb are preserved, so the output stays in colour. Matches the parameter defaults of SimBA’s CPU
clahe_enhance_video.See also
CPU reference (greyscale output):
clahe_enhance_video()and its multicore variantclahe_enhance_video_mp(). For GPU greyscale (no CLAHE), seeGreyscaleNVENC.Measured runtime (RTX 4070, h264, threaded decode, n_workers=1) Resolution
Frames
Source FPS
Time (s)
Encode FPS
800x600
108000
30
68.2
1584
Note
Validated against
cv2.createCLAHEover the same YCrCb pipeline. For tile grids that divide the frame evenly, the GPU output matches cv2 to ~1 grey level (max ~3, from uint8 YCrCb rounding). When the frame is not divisible by the tile count, this class uses ceil-sized tiles with per-tile normalisation rather than cv2’s reflect-padding, so edge tiles differ by a few levels (e.g. 800x600 @ (16,16): mean ~3, 84% of pixels within 5).- Parameters
data_path (Union[str, os.PathLike]) – A single video file, OR a directory of videos.
save_dir (Union[str, os.PathLike]) – Output directory. Each result is written to
save_dir/<name>.mp4(created if needed).clip_limit (int) – CLAHE contrast-amplification limit. Default 2.
tile_grid_size (Tuple[int, int]) – Number of tiles as (n_tiles_x, n_tiles_y), matching cv2’s tileGridSize. Default (16, 16).
codec (str) – NVENC codec (‘h264’, ‘hevc’, or ‘av1’). Default ‘h264’.
buffer_size (int) – Number of frames the threaded NVDEC decoder reads ahead per worker (overlaps decode with GPU compute/encode). Default 16.
n_workers (Optional[int]) – Number of parallel decode/encode pipelines (one per NVDEC/NVENC engine); each video is split into this many contiguous chunks, encoded concurrently, and concatenated. None auto-detects the GPU’s NVDEC count. Must be 1..(NVDEC count); larger raises. On a single-NVDEC GPU this is 1 (single stream). Default None.
verbose (bool) – If True, print progress. Default True.
- Example
>>> ClaheNVENC(data_path='in.mp4', save_dir='/out').run()
>>> ClaheNVENC(data_path='project_folder/videos', save_dir='/out', clip_limit=3).run()
- run()[source]
CLAHE-enhance every input video on the GPU and write each to
save_dir.
Greyscale conversion (GPU)
- class simba.data_processors.cuda.greyscale_nvenc.GreyscaleNVENC(data_path, save_dir, codec='h264', verbose=True)[source]
Convert a video to greyscale, fully on the GPU (NVDEC -> CUDA -> NVENC). GPU-only.
Measured runtime (RTX 4070, h264, single NVDEC/NVENC stream) Resolution
Frames
Source FPS
Time (s)
Encode FPS
800x600
108000
30
64.1
1684
Measured batch runtime (RTX 4070, h264, sequential over a directory) N videos
Resolution
Total frames
Time (s)
Overall FPS
Per-video avg (s)
20
800x600
2160000
1488.9
1451
74.4
- Parameters
data_path (Union[str, os.PathLike]) – A single video file, OR a directory of videos to convert.
save_dir (Union[str, os.PathLike]) – Output directory. Each converted video is written to
save_dir/<name>.mp4(created if it does not exist).codec (str) – NVENC codec (‘h264’, ‘hevc’, or ‘av1’). Default ‘h264’.
verbose (bool) – If True, print progress. Default True.
- Example
>>> GreyscaleNVENC(data_path='in.mp4', save_dir='/out').run()                 # single video
>>> GreyscaleNVENC(data_path='project_folder/videos', save_dir='/out').run()  # whole directory
- run()[source]
Egocentric rotation (GPU)
- class simba.data_processors.cuda.egocentric_rotator_nvenc.EgocentricRotatorNVENC(video_path, centers, rotation_vectors, anchor_location, save_path=None, fill_clr=(0, 0, 0), codec='h264', buffer_size=16, n_workers=None, verbose=True)[source]
Egocentric video rotation, fully on the GPU (NVDEC -> CUDA -> NVENC). GPU-only.
GPU counterpart of
EgocentricVideoRotator, taking the samecentersandrotation_vectors. Each frame is rotated about itscenterand translated so the center lands onanchor_location; combined into one affine and applied as an inverse warp with bilinear interpolation.See also
CPU version:
EgocentricVideoRotator. To producecenters/rotation_vectors:egocentrically_align_pose_numba()oregocentrically_align_pose().Measured runtime (RTX 4070, h264, threaded decode, n_workers=1) Resolution
Frames
Source FPS
Time (s)
Encode FPS
800x600
108000
30
65.7
1643
- Parameters
video_path (Union[str, os.PathLike]) – Path to the video to rotate.
centers (np.ndarray) – (n_frames, 2) anchor location per frame (pre-alignment).
rotation_vectors (np.ndarray) – (n_frames, 2, 2) per-frame rotation matrices.
anchor_location (Tuple[int, int]) – (x, y) target location the anchor is moved to.
save_path (Union[str, os.PathLike]) – Output path. If None,
<video>_rotated.mp4next to the source.fill_clr (Tuple[int, int, int]) – RGB fill for out-of-frame pixels. Default (0, 0, 0).
codec (str) – NVENC codec (‘h264’, ‘hevc’, or ‘av1’). Default ‘h264’.
buffer_size (int) – Threaded NVDEC read-ahead per worker. Default 16.
n_workers (Optional[int]) – Parallel decode/encode pipelines (one per NVDEC engine); None auto-detects. Default None.
verbose (bool) – If True, print progress. Default True.
- Example
>>> _, centers, rot = egocentrically_align_pose(data=data, anchor_1_idx=6, anchor_2_idx=2, anchor_location=np.array([250, 250]), direction=0)
>>> EgocentricRotatorNVENC(video_path='in.mp4', centers=centers, rotation_vectors=rot, anchor_location=(250, 250)).run()
- run()[source]
Rotate the whole video on the GPU and write it to
save_path. Withn_workers> 1 the video is split into contiguous chunks encoded concurrently, then concatenated.